Auto-Discovery
Automatic discovery, as the name suggests, automatically discovers various operational resources, and changes to resources are promptly reflected in the CMDB, reducing the cost of manual data maintenance.
The construction of automatic discovery generally consists of three steps: creating automatic discovery rules, associating models with automatic discovery rules, and executing automatic discovery. Next, we will briefly explain these three steps.
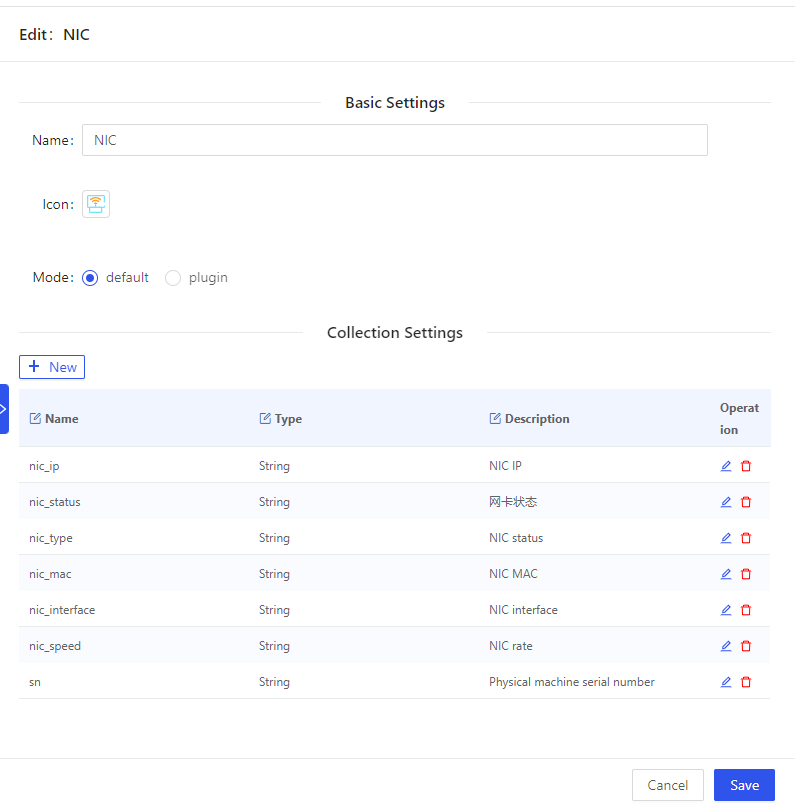
Create rules for auto-discovery
Please enter the autodiscovery rules configuration page through “Backend/AutoDiscovery”.
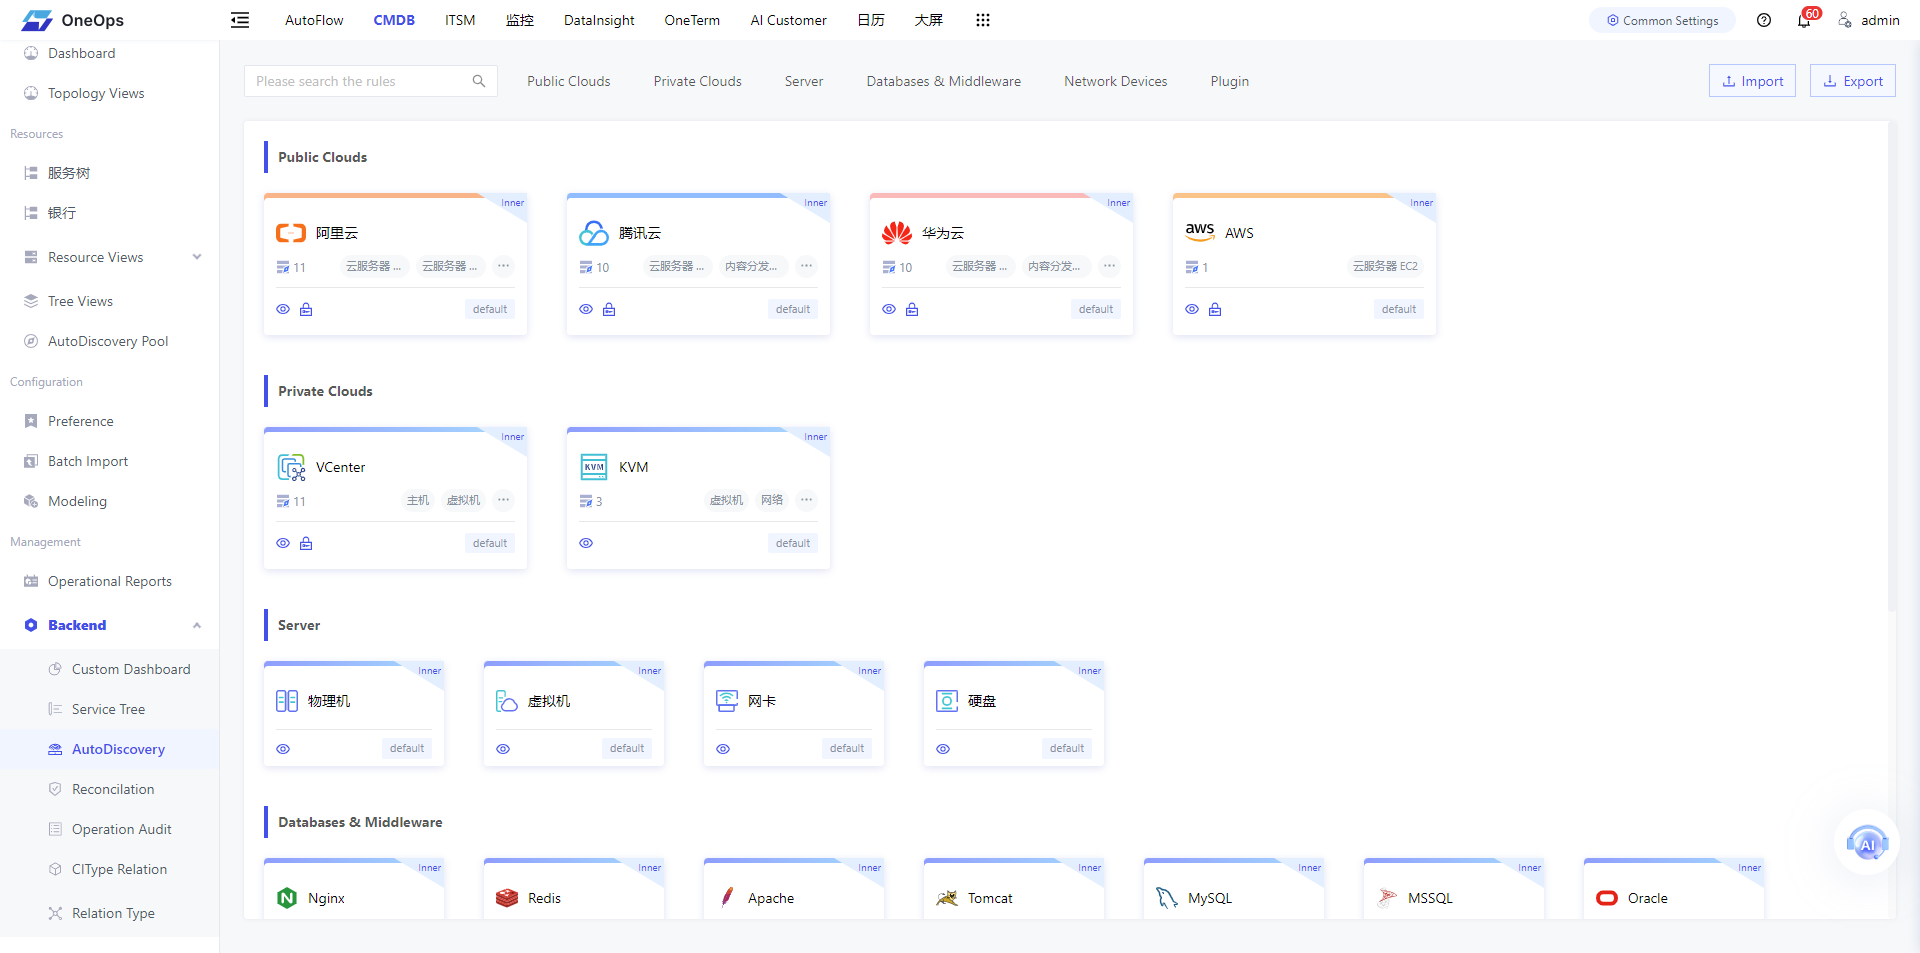
The automatic discovery rule for Veops CMDB consists mainly of three categories:
Built-in and Custom Plugins
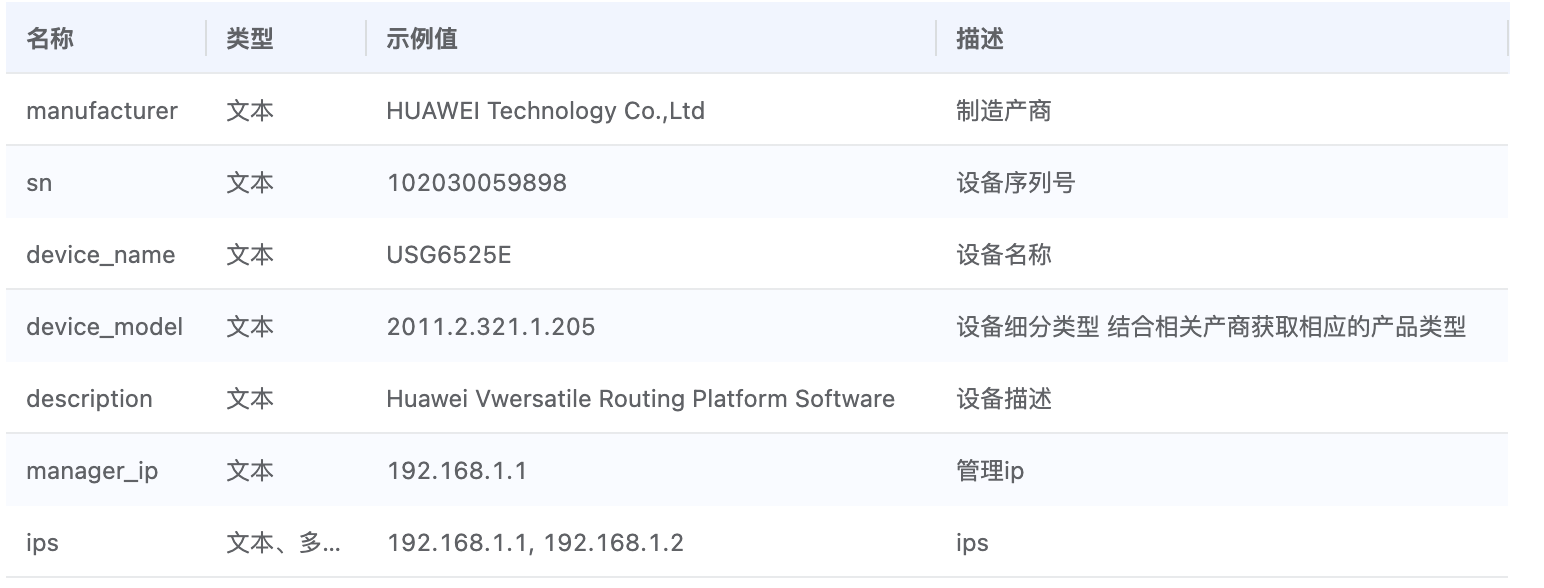
The built-in plugin integrates the discovery of physical machines, virtual machines, hard disks, and network cards into the OneAgent (Note: VeOps Unified Operations Probe OneAgent, which can be freely applied for on the official website). Clicking on the automatic discovery rules of the built-in plugin presents the collected attribute list, as shown in the figure below:
Custom plugins are actually capable of achieving all other acquisition requirements such as MySQL, Nginx, Tomcat, etc. Automatically discover a custom plugin that is simple to implement a python script:
# -*- coding:utf-8 -*-

import json


class AutoDiscovery(object):

    @property
    def unique_key(self):
        """

        :return: Returns the name of a unique attribute
        """
        return

    @staticmethod
    def attributes():
        """
        Define attribute fields
        :return: Returns a list of attribute fields. The list items are (name, type, description). The name must be in English.
        type: String Integer Float Date DateTime Time JSON
        For example:
        return [
            ("ci_type", "String", "CIType name"),
            ("private_ip", "String", "Internal IP, multiple values separated by commas")
        ]
        """
        return []

    @staticmethod
    def run():
        """
        Execution entry, returns collected attribute values
        :return:
        Returns a list, the list item is a dictionary, the dictionary key is the attribute name, and the value is the attribute value
        For example:
        return [dict(ci_type="server", private_ip="192.168.1.1")]
        """
        return []


if __name__ == "__main__":
    result = AutoDiscovery().run()
    if isinstance(result, list):
        print("AutoDiscovery::Result::{}".format(json.dumps(result)))
    else:
        print("ERROR: The collection return must be a list")
The collected attributes must contain unique attributes of the model, otherwise the entry cannot be completed.
Autodiscovery of network devices
This discovery capability is also embedded in OneAgent and collects network devices via network protocols such as SNMP, which are currently implemented mainly through switches, routers, firewalls, printer.
Discovery of public and private cloud resources
Auto-discovery of public and private cloud resources as an Enterprise Edition feature.
By docking the open APIs of cloud vendors, the active timed rounds of training to obtain cloud resources, currently integrated with the auto-discovery of cloud hosts such as Aliyun, Tencent Cloud, Huawei Cloud, AWS, VCenter, KVM, etc., and the discovery of cloud resources will be expanded in the future. Of course, if you have deployed OneAgent on the cloud host itself, you can actually use the built-in auto-discovery plug-in for virtual machines to do the acquisition.
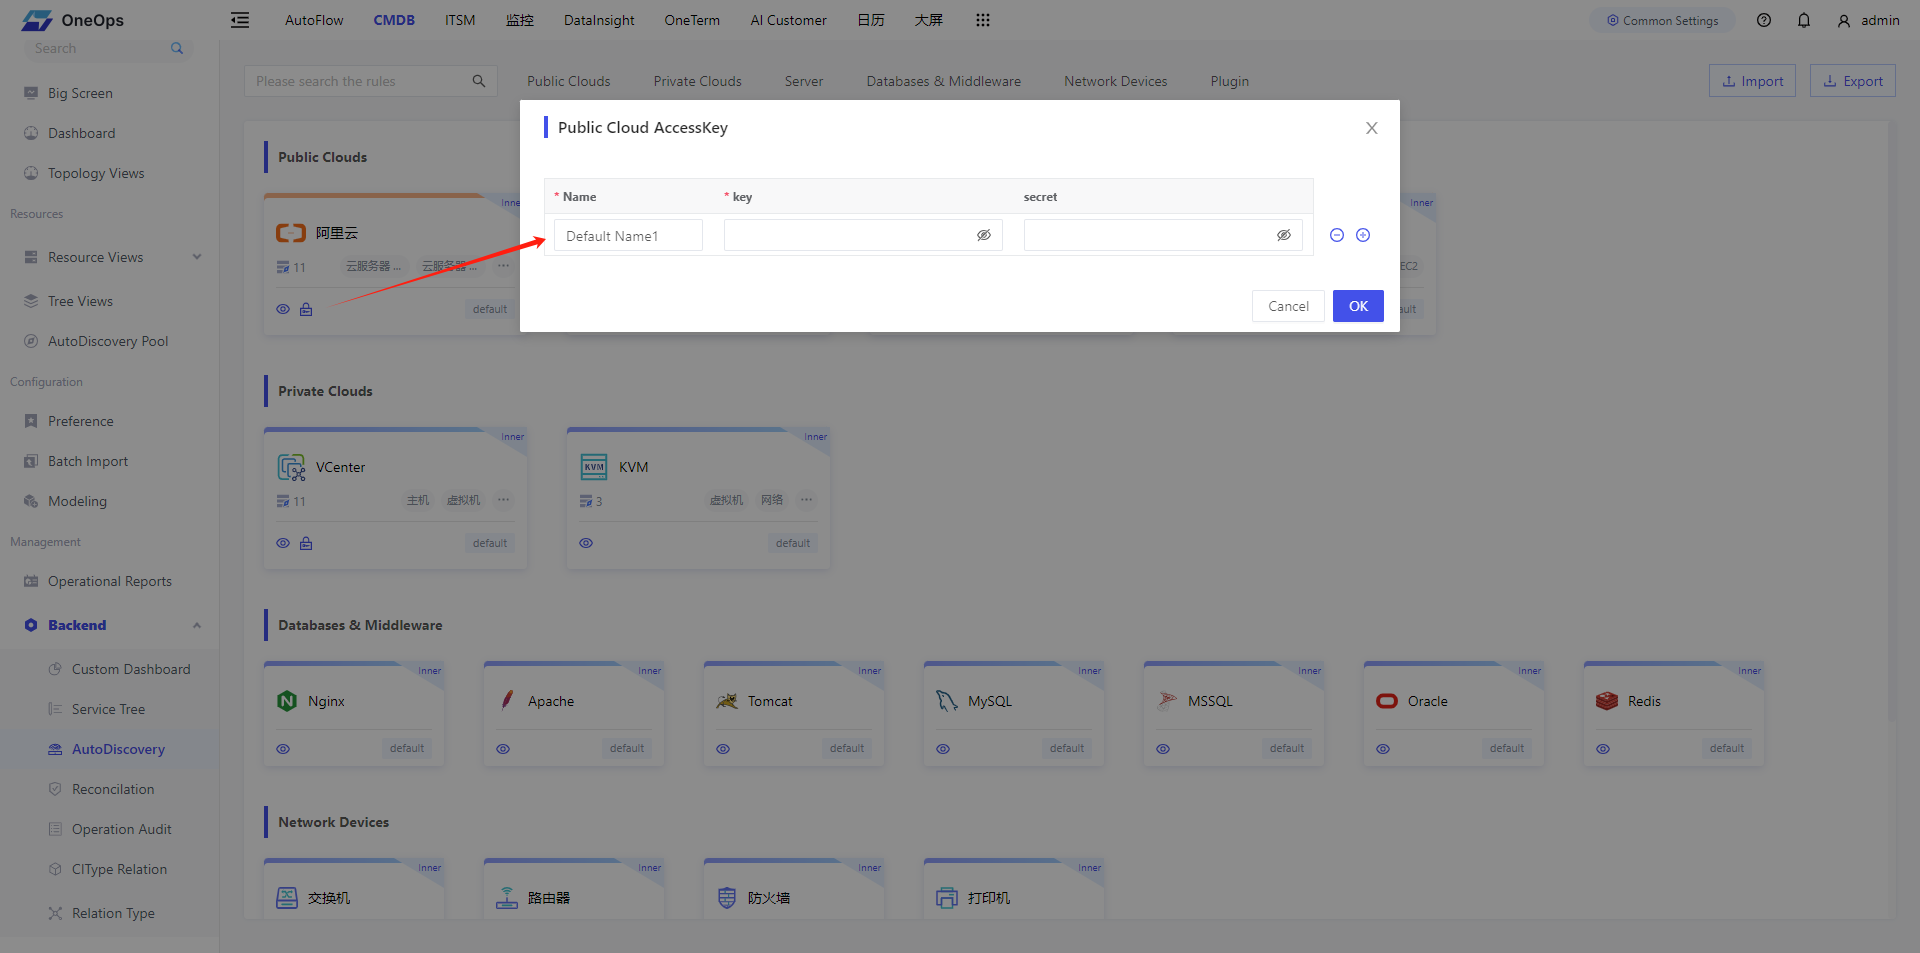
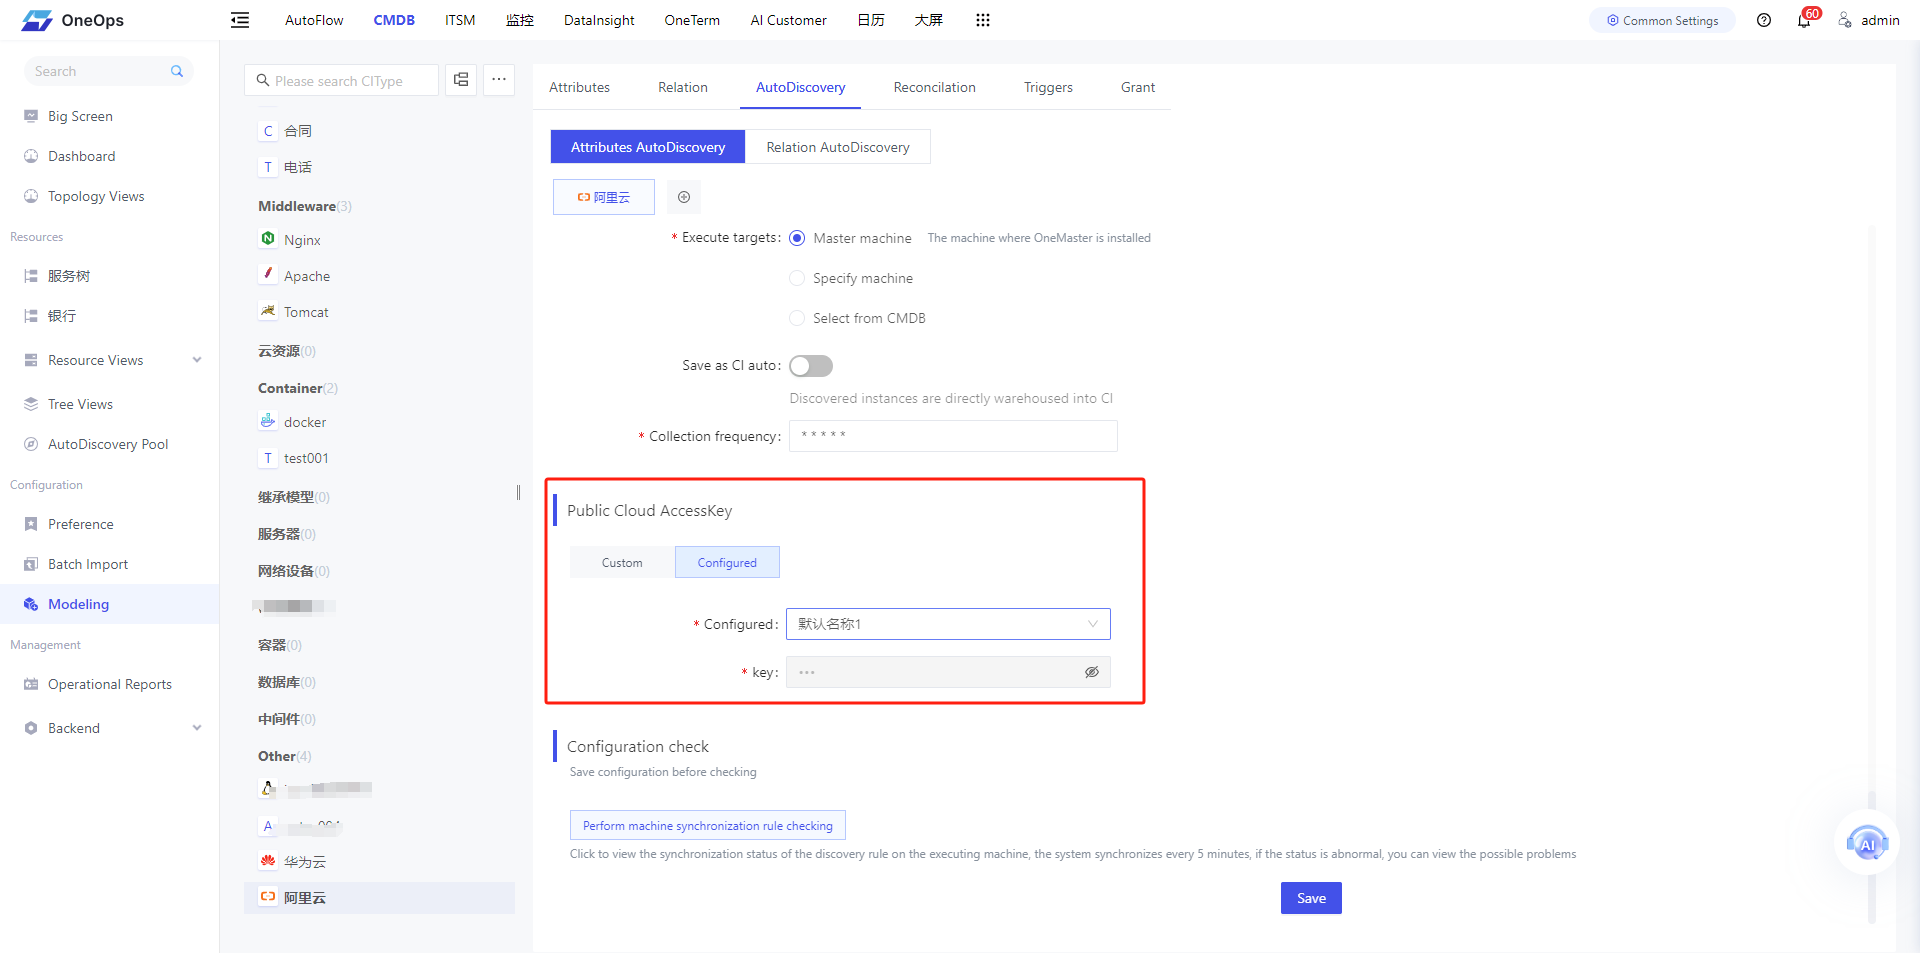
Public Cloud AccessKey Configuration
As shown in the following figure, you can unify the configuration and management of public cloud AccessKey:
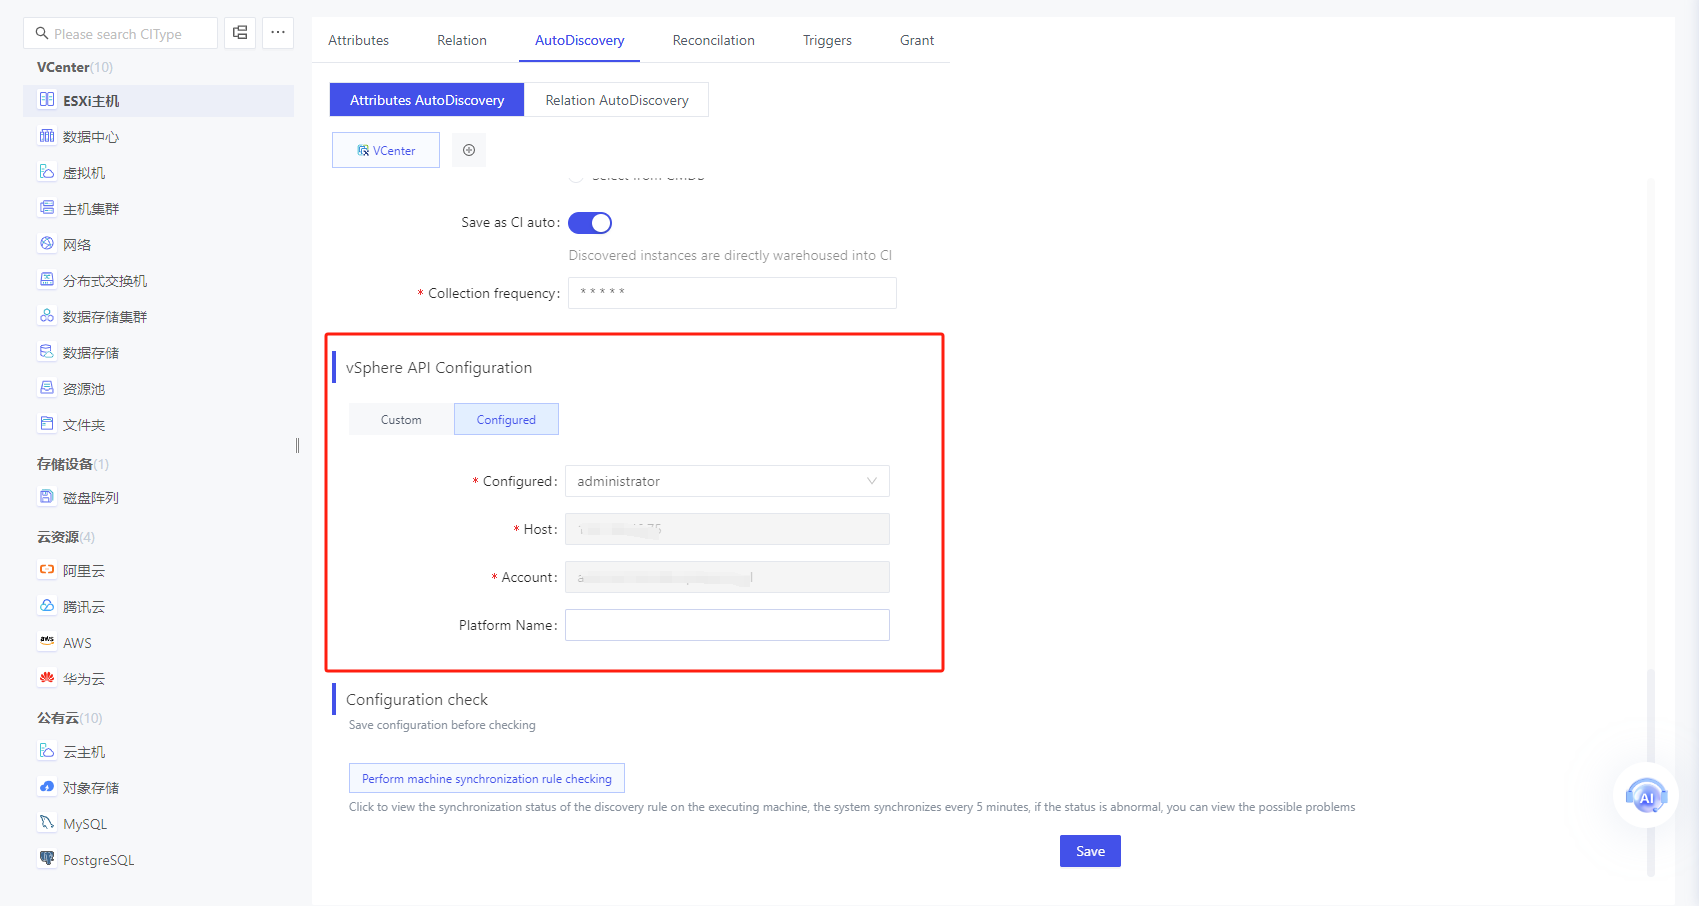
VCenter Account Configuration
As shown in the following figure, you can configure and manage VCenter accounts in a unified way:

Model association autodiscover rules
Model properties found automatically
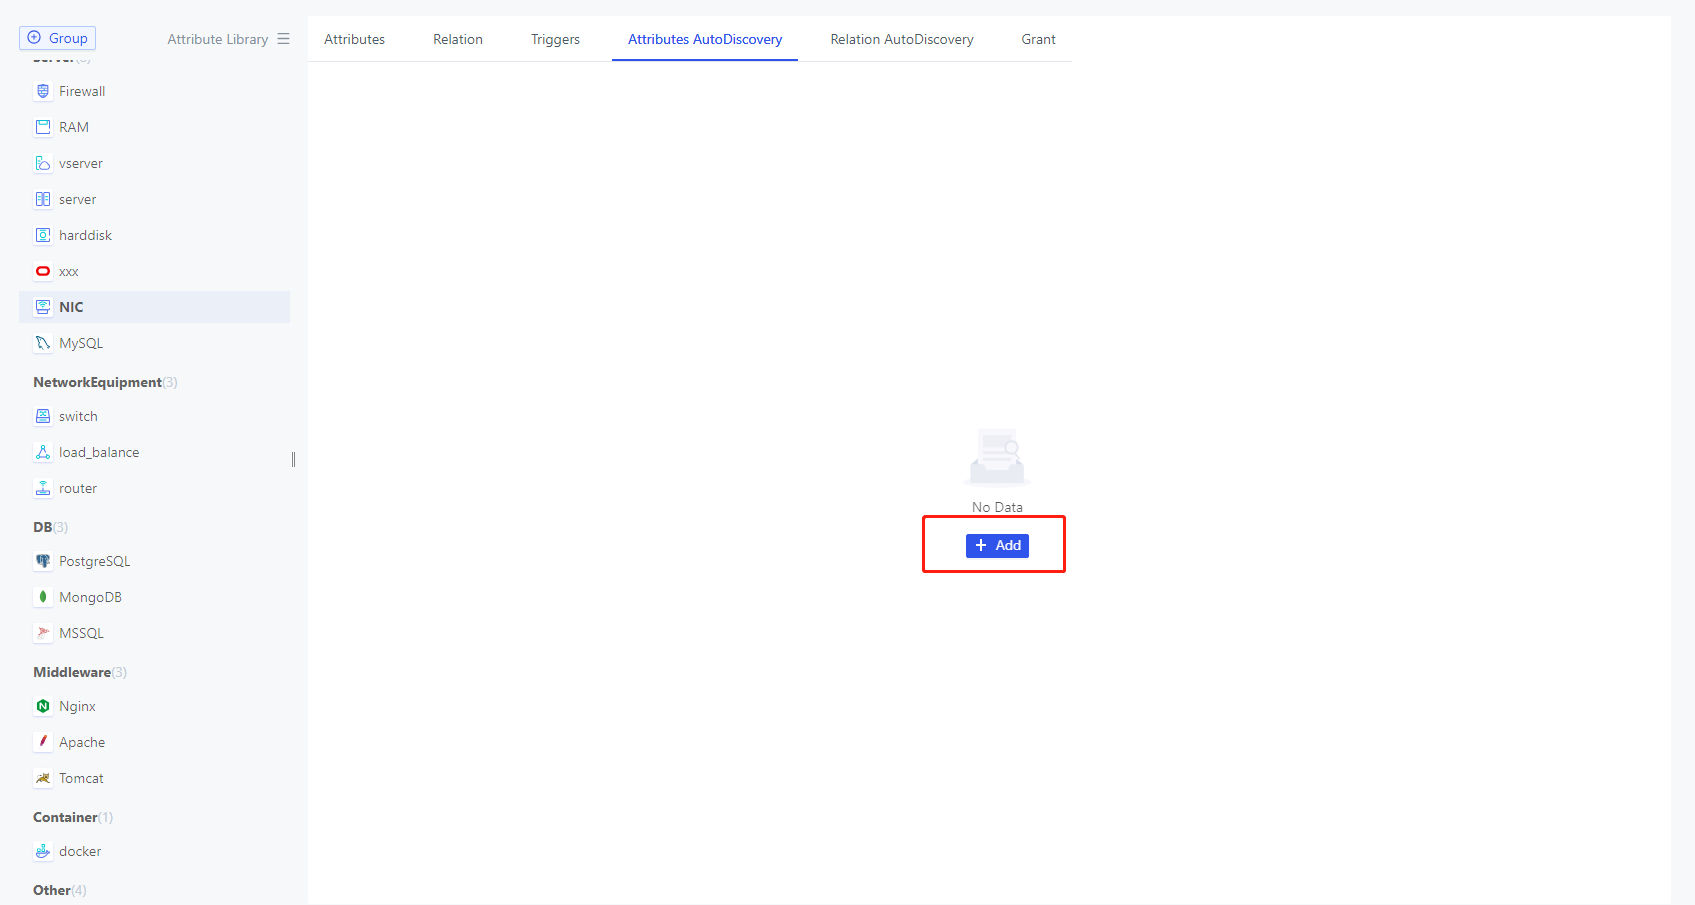
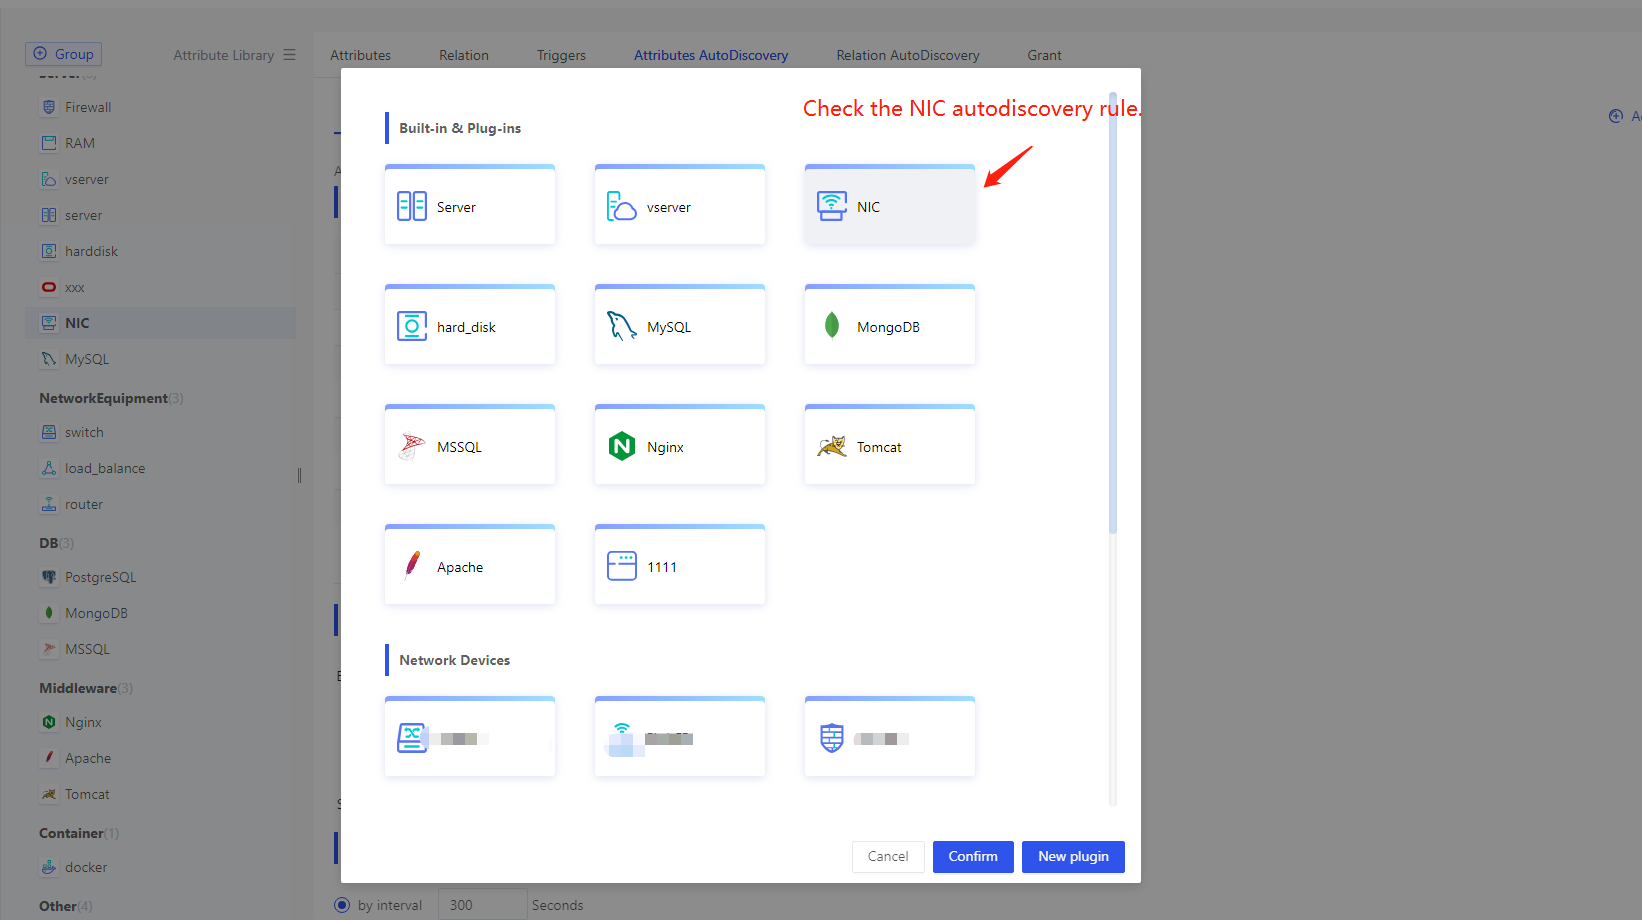
First, open the “Modeling” menu, go to the “AutoDiscovery” page of the model (e.g. NIC), click the “Add” button, and then in the popup autodiscovery rule list, select the “NIC” autodiscovery rule and click “OK” button to submit, then you can associate the model with the auto-discovery rule.
Taking the network card as an example for illustration. mainly of attribute mappings and execution configuration :
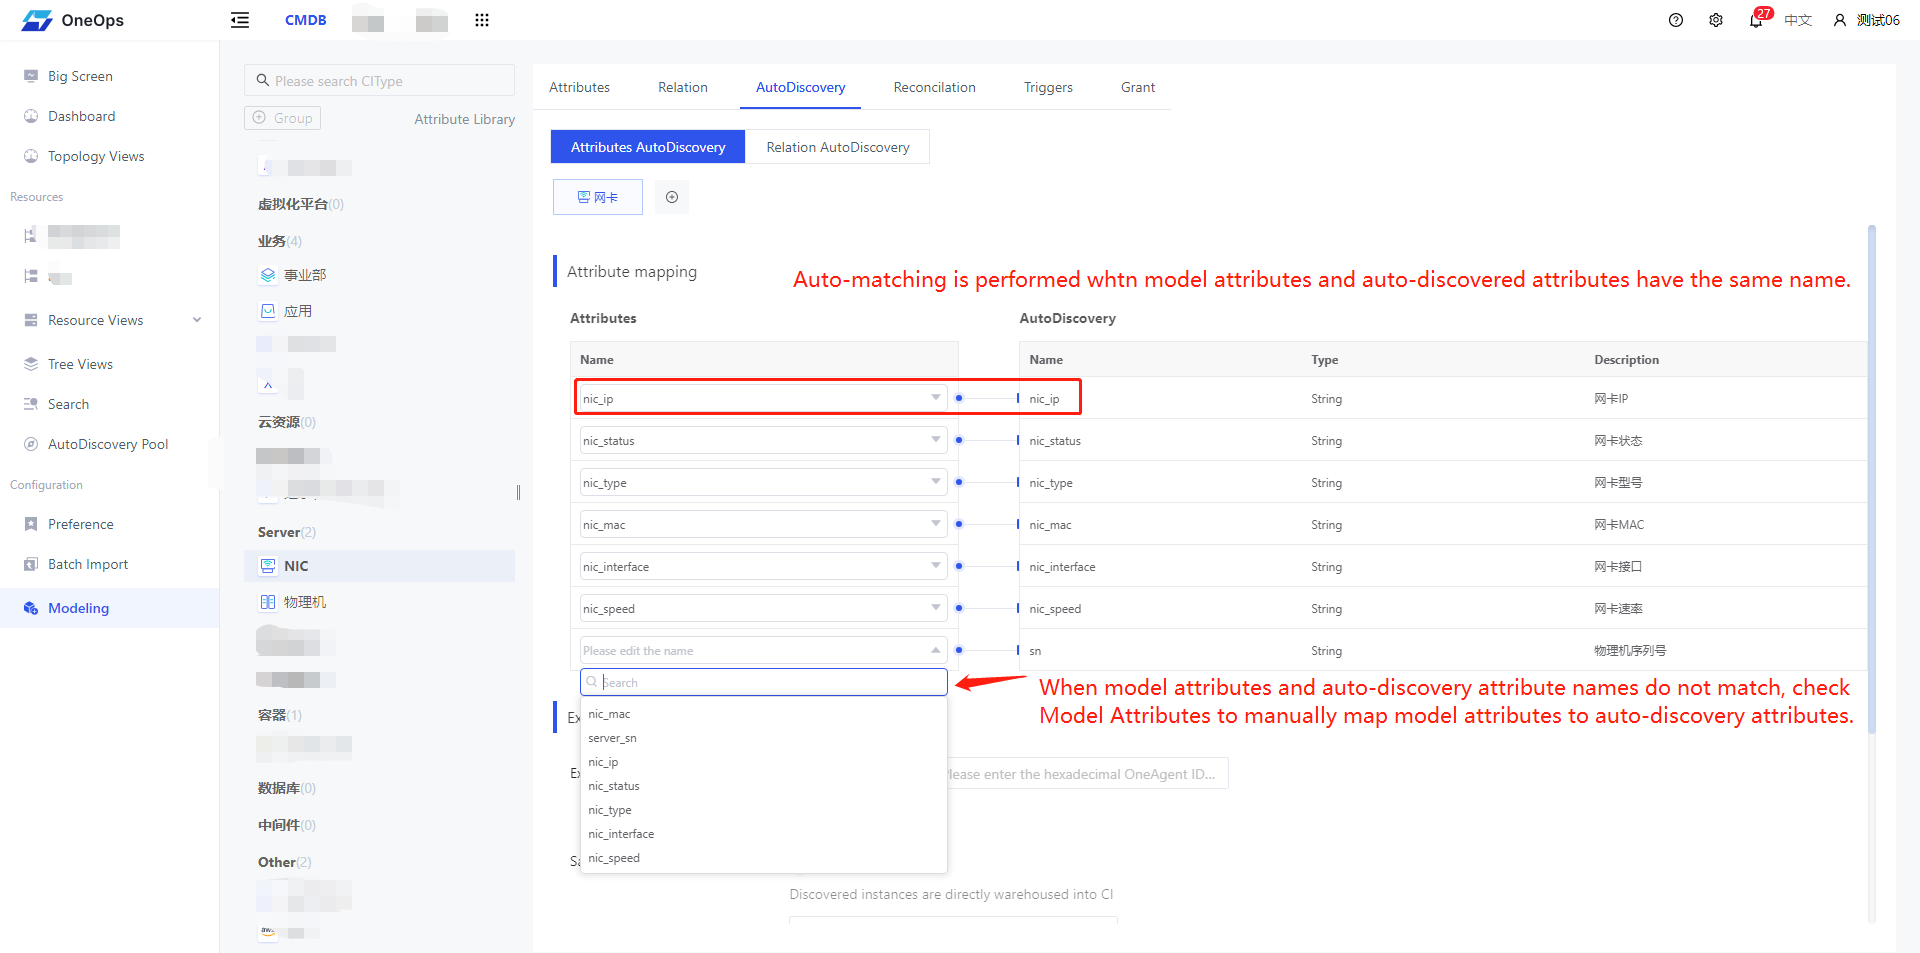
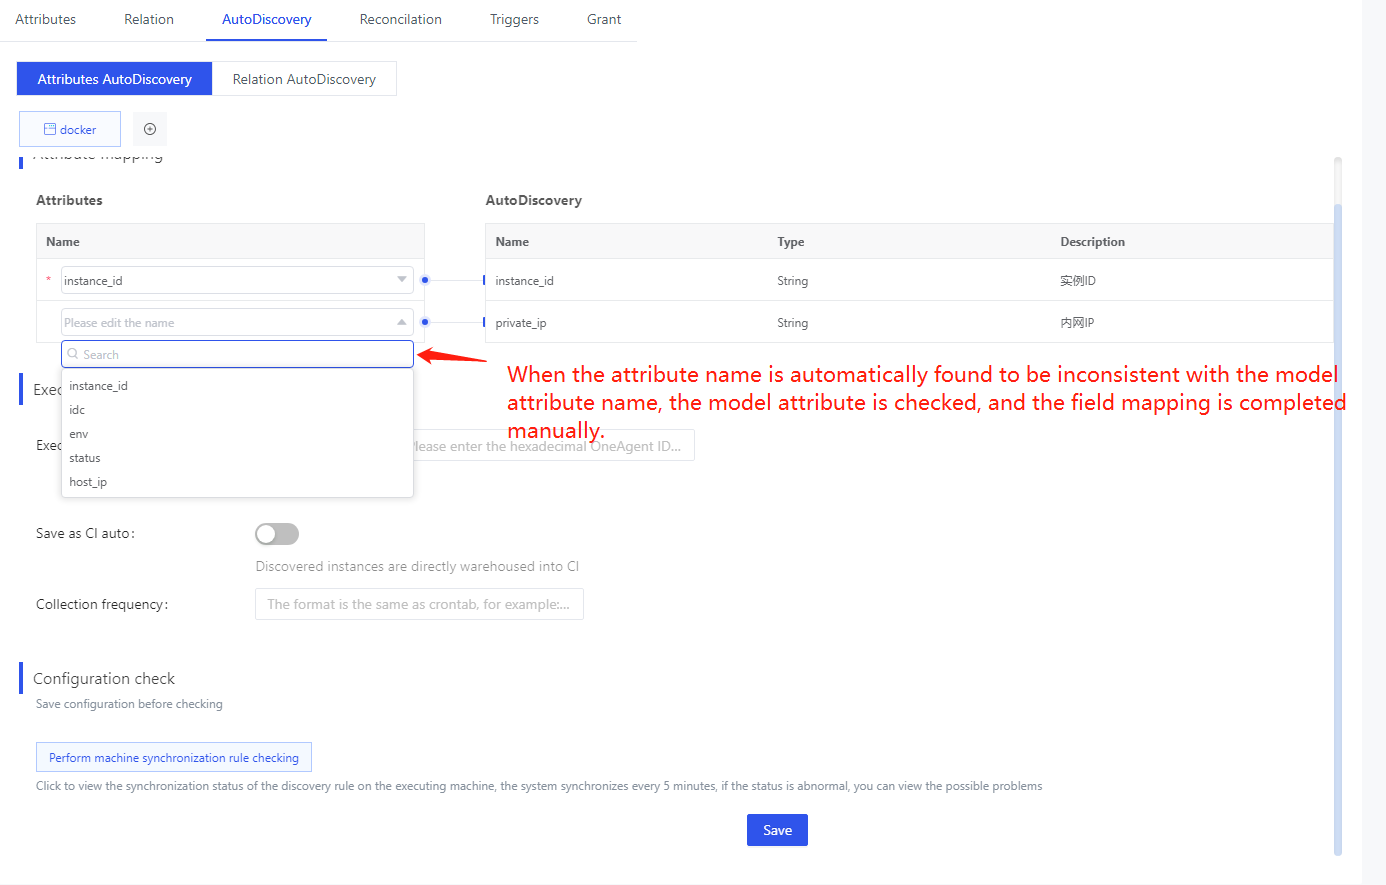
1) Attribute Map
after associating with the built-in network card auto-discovery rules, the attribute names of the model will be automatically matched with the attribute names of the auto-discovery rules. If the names are different, manual matching is required. In fact, each model can apply multiple auto-discovery rules, and each rule may collect some attributes of the model.
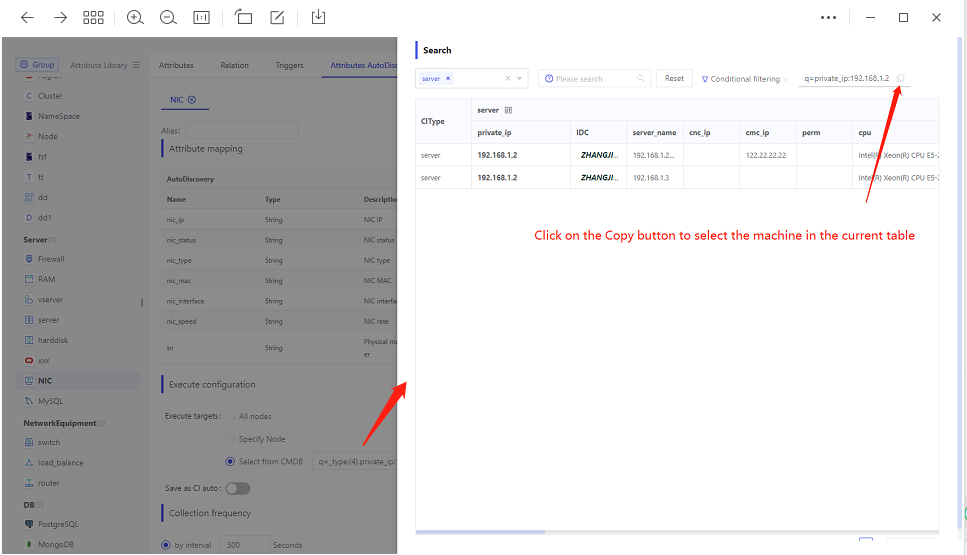
2) Execute the configuration to specify the target machine for which the rules are executed automatically, available with:
- Master machine: The machine where OneMaster is installed.
The master machine does not support discovery of server type data such as physical machines, virtual machines, network cards, hard disks, etc.
- All nodes: such as servers, virtual machines, etc. must be an administrator to configure all nodes.
- A specific node: such as automatic discovery of a public cloud resource or a network device, is performed by a specific node.
- Select from CMDB: to select all the physical machines in the CMDB, for example a network card.
Secondly, you can choose whether to automatically add to the repository. Generally speaking, if the accuracy of automatic discovery is close to 100%, you can directly choose automatic addition to the repository, which means instances discovered automatically will be directly added to the CI. If you choose not to automatically add to the repository, instances will first enter the automatic discovery resource pool, and then they will need to be manually added to the CI in batches.
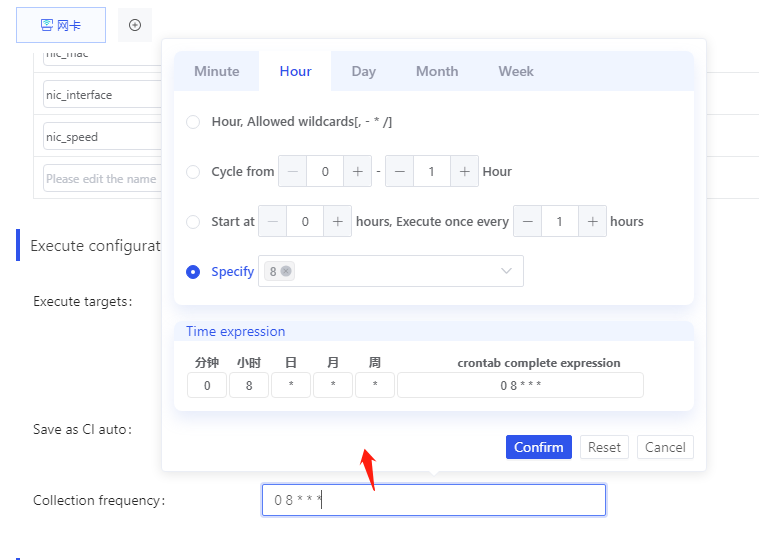
3) Collection frequency Users can self-configure the collection frequency, support cron settings, as shown below:
4) Public Cloud AccessKey If a public cloud autodiscovery rule is associated, you need to fill in the public cloud AccessKey:
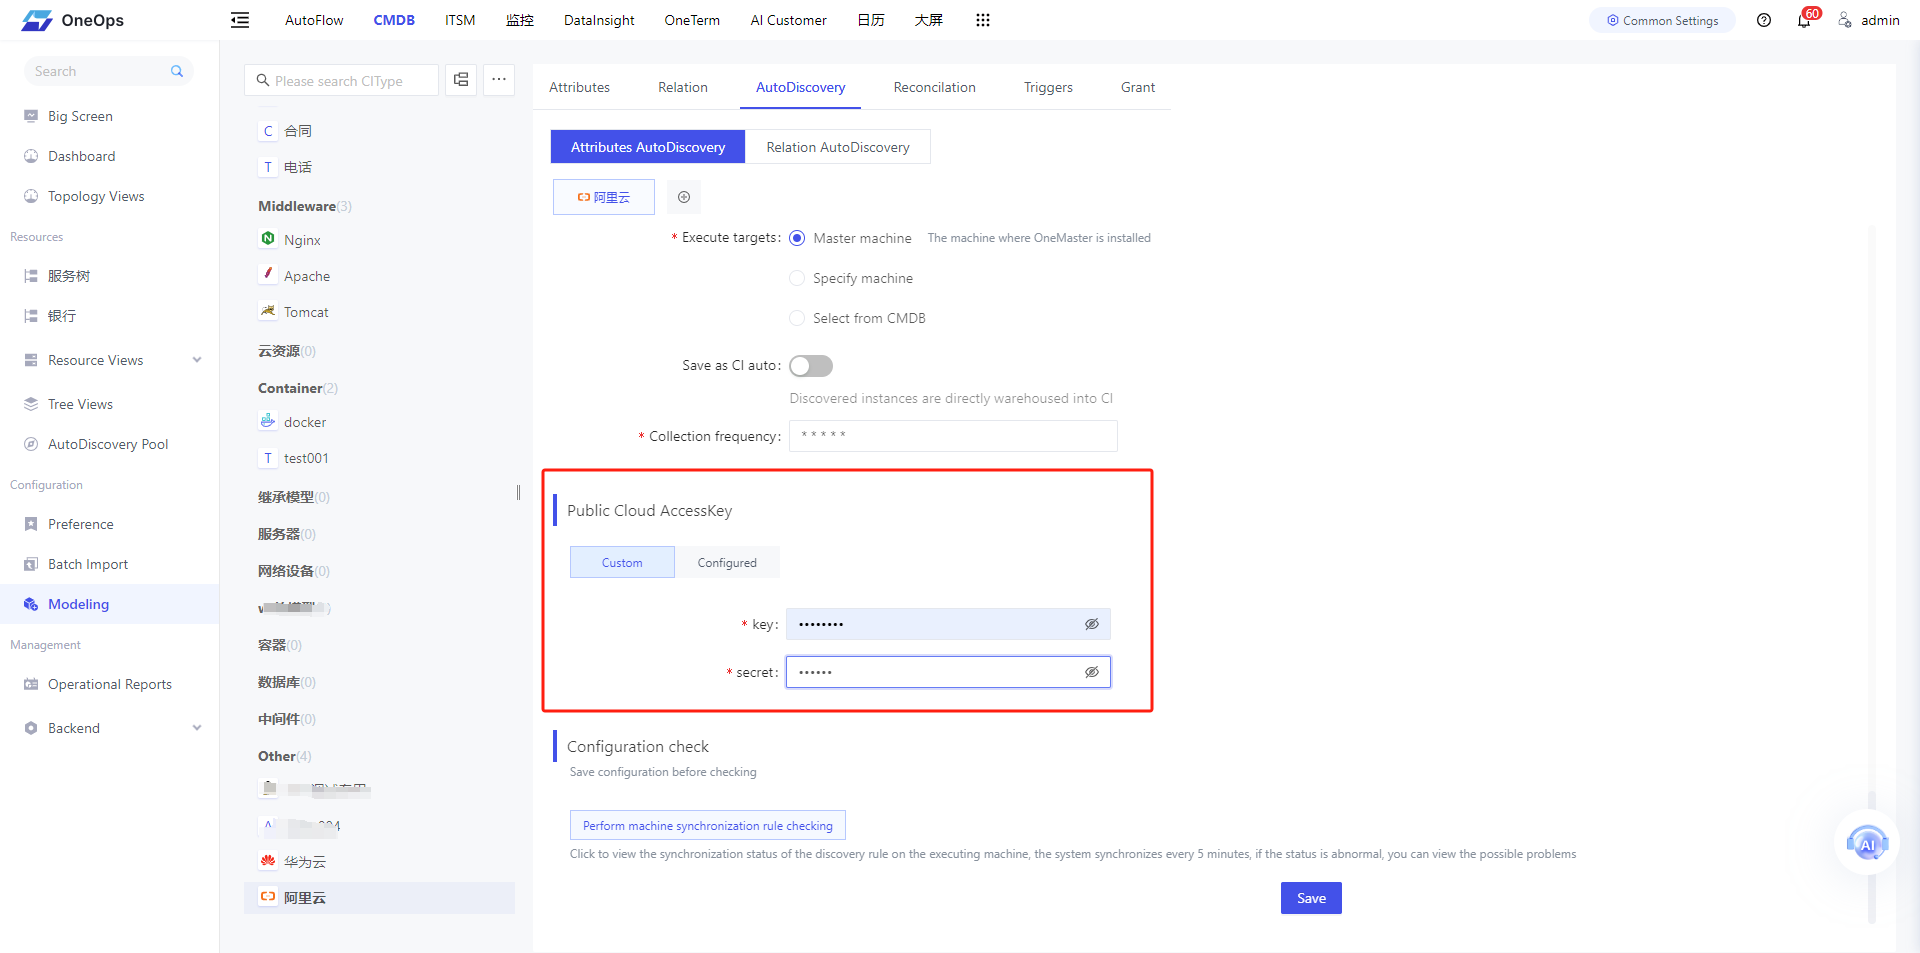
As shown in the figure above, in addition to customizing the input key and secret, it also supports selecting from existing configurations, and you can manage existing configurations through Public Cloud AccessKey Configuration above
5) vSphere API Configuration If a VCenter autodiscovery rule is associated, you need to fill out the vSphere API configuration:

As shown above, in addition to customizing the input, it also supports selecting from existing configurations, and you can manage existing configurations through VCenter Account Configuration above
6) Configuration check
Click to view the synchronization status of the discovery rule on the executing machine, the system synchronizes every 5 minutes, if the status is abnormal, you can view the possible problems
You can check if the Agent is online by clicking on the "Perform machine synchronization rule checking" button:

If the status is down, check the Agent as follows
- Check if OneAgent process is alive
- View OneAgent logs with autodiscovery rule synchronisation every 5 minutes
Relation auto-discovery
- Relationship autodiscovery assumes that there is attribute autodiscovery configured
- When an auto-discovered attribute matches an associated model attribute, the two instance models are automatically associated
- If the value of the auto-discovered attribute is a list, multiple relationships are established with the association model.For example, if the value of auto-discovered attribute is [1,2,3], after the collected data is stored as CI, it will automatically establish relationship with CIs whose attribute values of the associated model are 1, 2 and 3 respectively.
Relationship autodiscovery supports multiple attributes, i.e., relationships can be automatically constructed with multiple models.
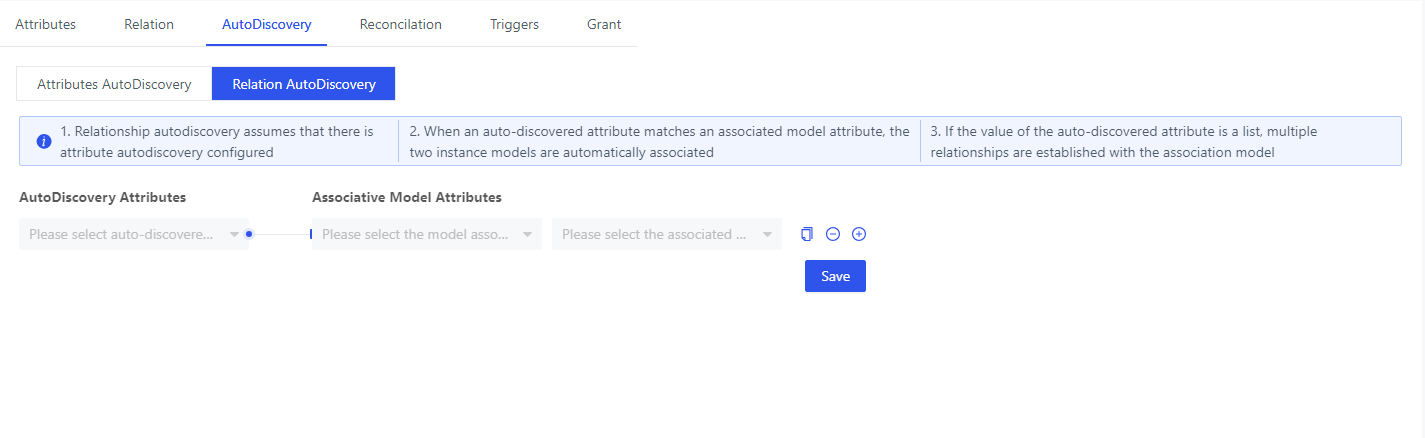
As shown in the above figure, on the left side, you can select the list of auto-discovered attributes (the list of auto-discovered attributes is derived from the saved attribute auto-discovery rules), and on the right side, you can configure the associated model attributes. You can configure multiple relationship auto-discovery rules by clicking the button "+" on the right side.
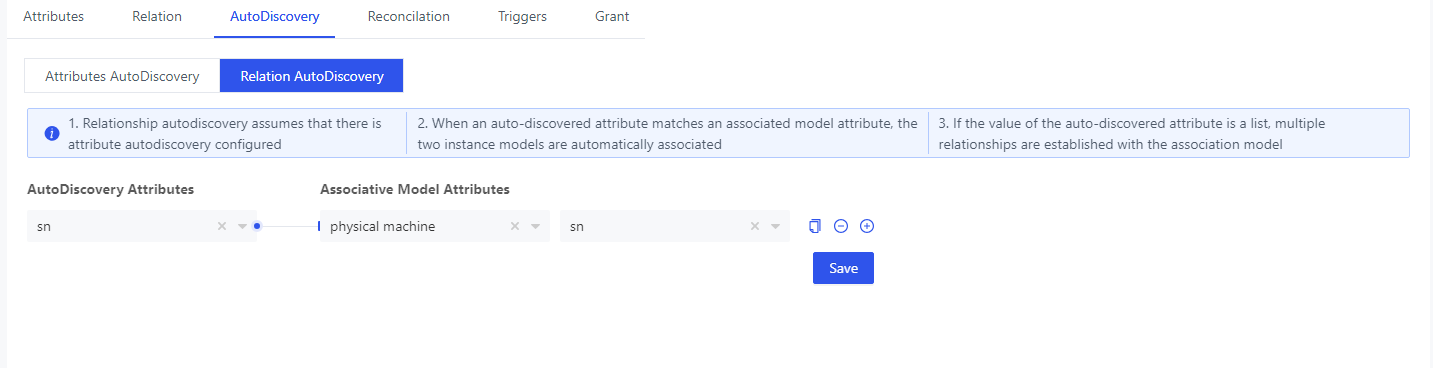
Take the NIC as an example for illustration: as shown in the figure below, you only need to configure the attribute sn (the serial number of the physical machine, which is actually a redundant field for the NIC model) of the NIC collection and the serial number of the physical machine model to establish a relationship, when the collection of up to the NIC into the library of the CMDB, it will be used in the field to establish a relationship between the NIC and the physical machine
Execute auto discovery
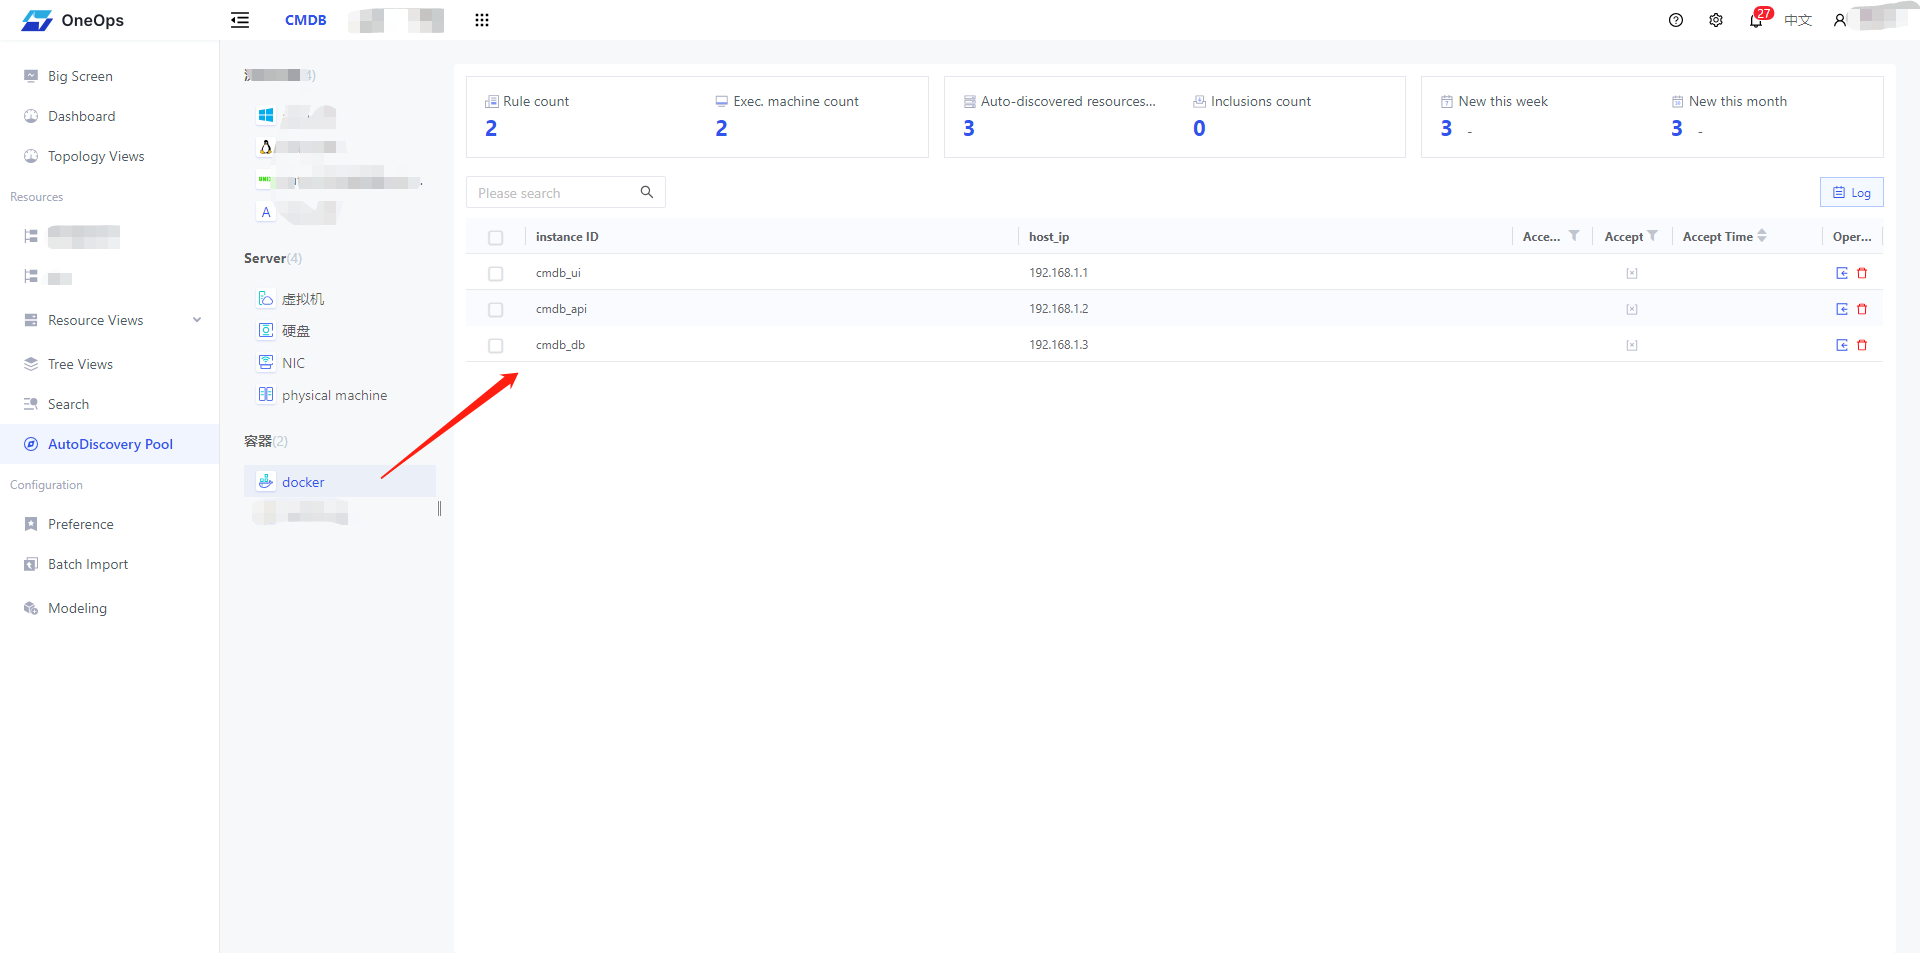
After the model association with the auto-discovery rule is established, OneAgent will automatically synchronize the auto-discovery rules of the node it resides on at regular intervals. Subsequently, it executes the auto-discovery rules. If the collected data differs from the previous collection, it pushes the data to the server. The data collected by auto-discovery will be displayed in the auto-discovery pool, click and enter the “Auto-discovery Pool” on the left menu of the system, and then click on the model associated with auto-discovery rules (such as NIC), you can view the auto-collected data in the table on the left side, as shown in the following figure:
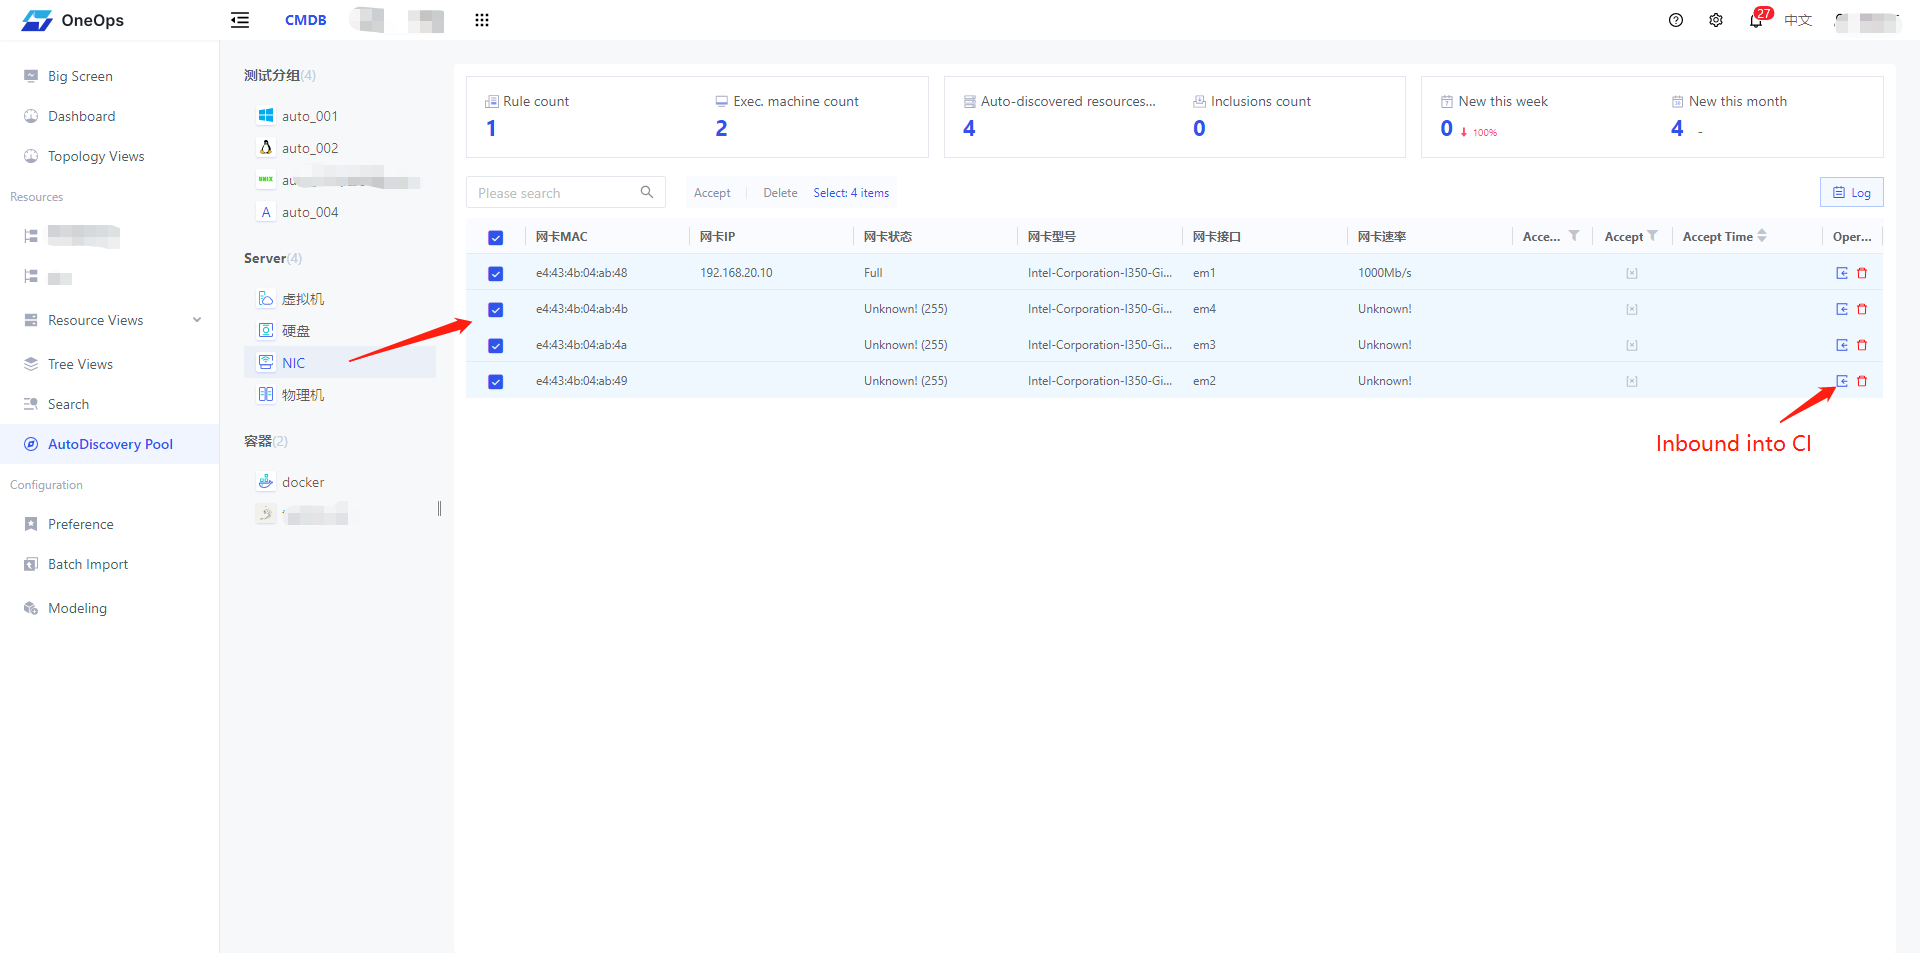
In the auto-discovery pool, the top of the page shows some statistical fields, such as the number of rules (the total number of attribute auto-discovery rules and relationship auto-discovery rules configured in the current model), the number of executing machines, the number of auto-discovered resources, the number of inbound resources, the number of new additions in this week, the number of new additions in this month, and so on. The bottom of the page shows all the details of the auto-discovered resources in the form of a table. In addition to viewing the attribute details, whether it is inbound, when it was inbound, who it was inbound, and other fields, the user can also perform the operations of inbounding individual data, and batch inbounding into CI.
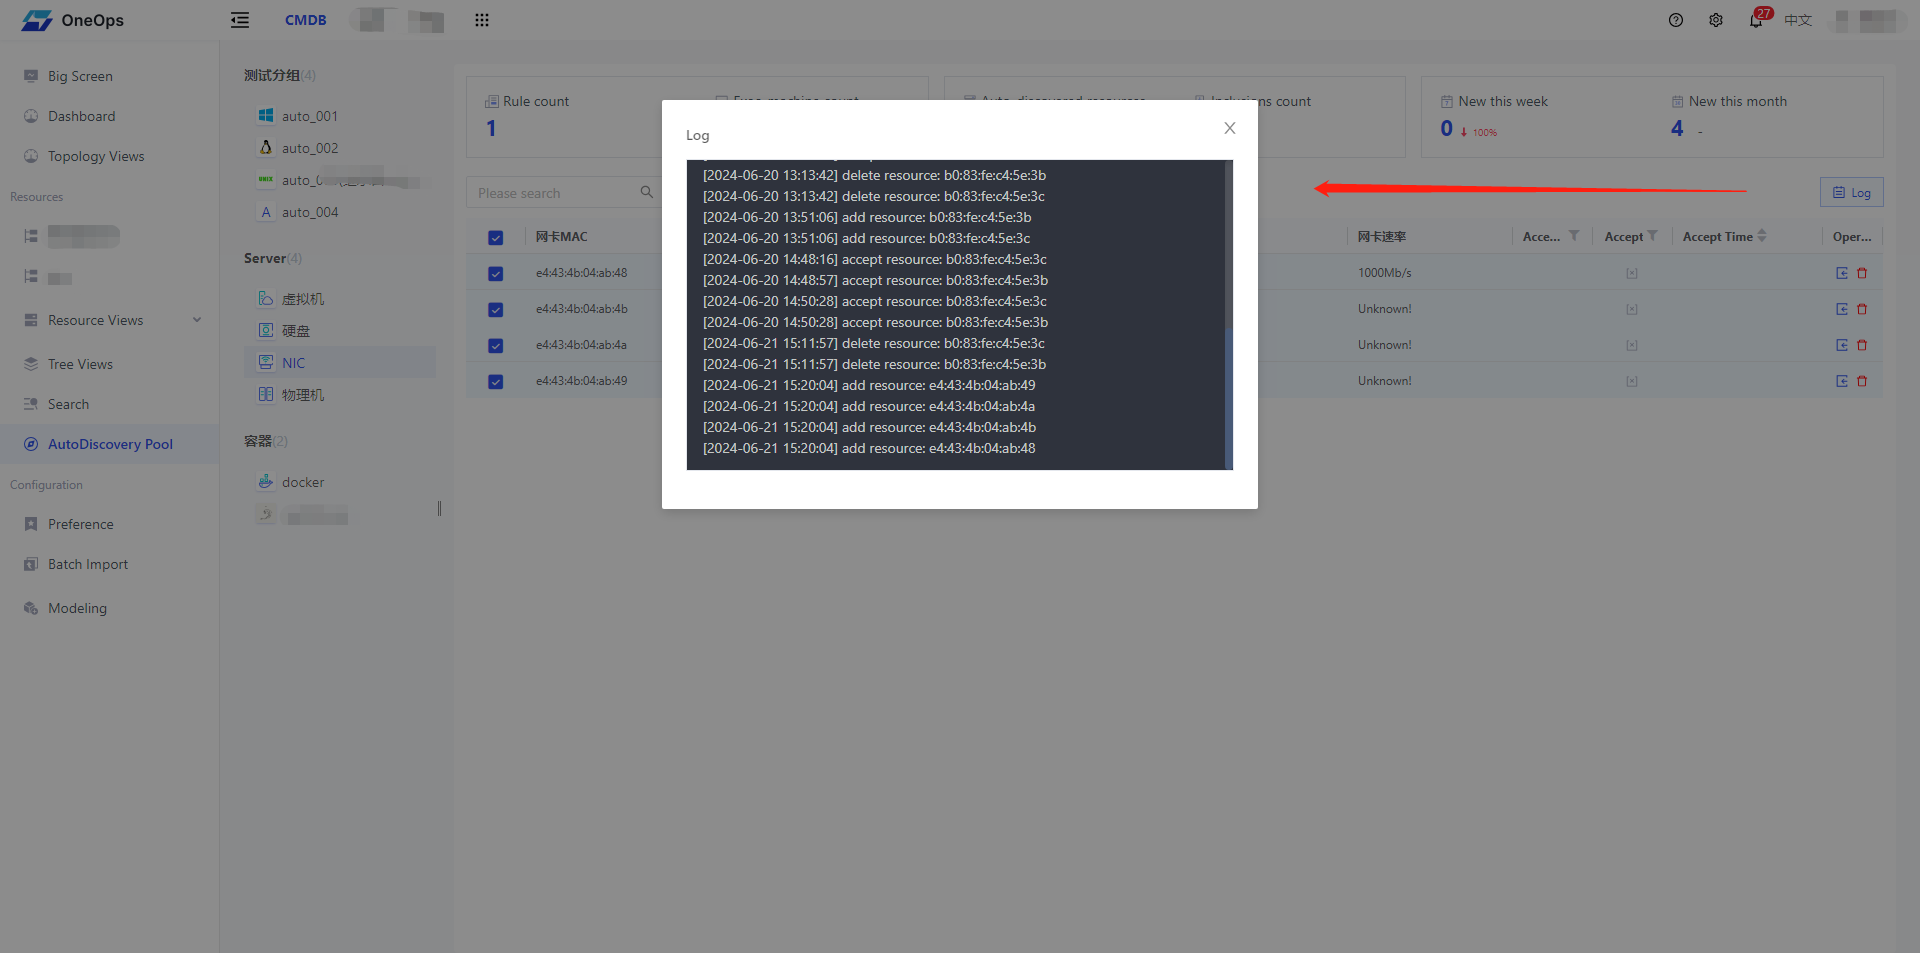
Click on the "Log" button in the upper right corner to see information about collection errors, additions, deletions, and the time the resource was added.
For data that does not have auto-enrollment turned on, in the autodiscovery pool, users can manually batch-enroll unenrolled data into CI instances.
Example demo: Data autodiscovery through custom plugins
The next step is to demonstrate the whole process of auto-discovery of data in Veops CMDB through the auto-discovery rules of a custom plug-in.
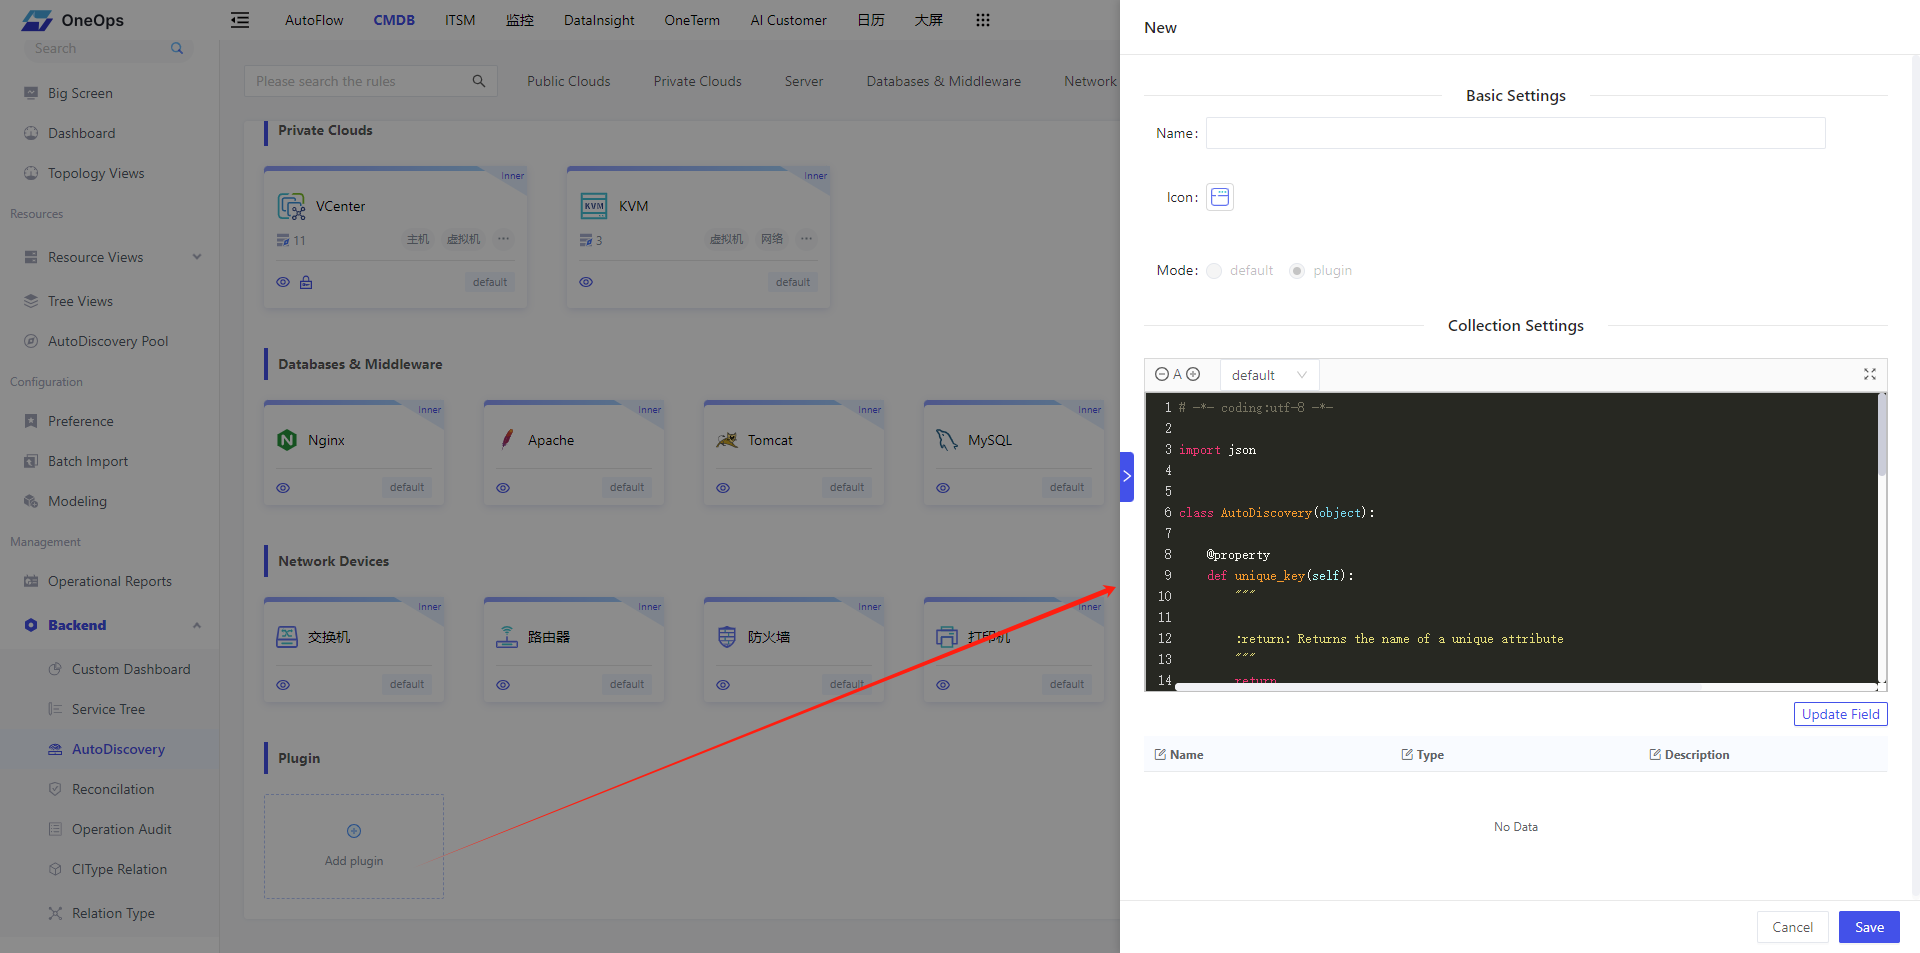
1. Creating custom plug-ins
Please enter the autodiscovery rules configuration page through “Backend/AutoDiscovery”.
Click on the "+" icon below the plugin, enter the new plug-in page, fill in the Name, Icon, Mode select “plugin”, collection settings provide a python sample code.
There are three methods in the AutoDiscovery class in the template: unique_key, attributes, and run. We need to return the required data via return in the format agreed upon in the template.
# -*- coding:utf-8 -*-

import json


class AutoDiscovery(object):

    @property
    def unique_key(self):
        """

        :return: Returns the name of a unique attribute
        """
        return 'instance_id'

    @staticmethod
    def attributes():
        """
        Define attribute fields
        :return: Returns a list of attribute fields. The list items are (name, type, description). The name must be in English.
        type: String Integer Float Date DateTime Time JSON
        For example:
        return [
            ("ci_type", "String", "CIType name"),
            ("private_ip", "String", "Internal IP, multiple values separated by commas")
        ]
        """
        return [
            ("instance_id", "String", "instance ID"),
            ("private_ip", "String", "Intranet IP"),
        ]

    @staticmethod
    def run():
        """
        Execution entry, returns collected attribute values
        :return:
        Returns a list, the list item is a dictionary, the dictionary key is the attribute name, and the value is the attribute value
        For example:
        return [dict(ci_type="server", private_ip="192.168.1.1")]
        """
        return [
            dict(instance_id="cmdb_ui", private_ip="192.168.1.1"),
            dict(instance_id="cmdb_api", private_ip="192.168.1.2"),
            dict(instance_id="cmdb_db", private_ip="192.168.1.3")
        ]


if __name__ == "__main__":
    result = AutoDiscovery().run()
    if isinstance(result, list):
        print("AutoDiscovery::Result::{}".format(json.dumps(result)))
    else:
        print("ERROR: The collection return must be a list")
After filling out the python collection code according to the example above, click the button “Update Field” and the list of attributes returned by the attributes method in the script will be displayed in the table below. As you can see in the picture below:
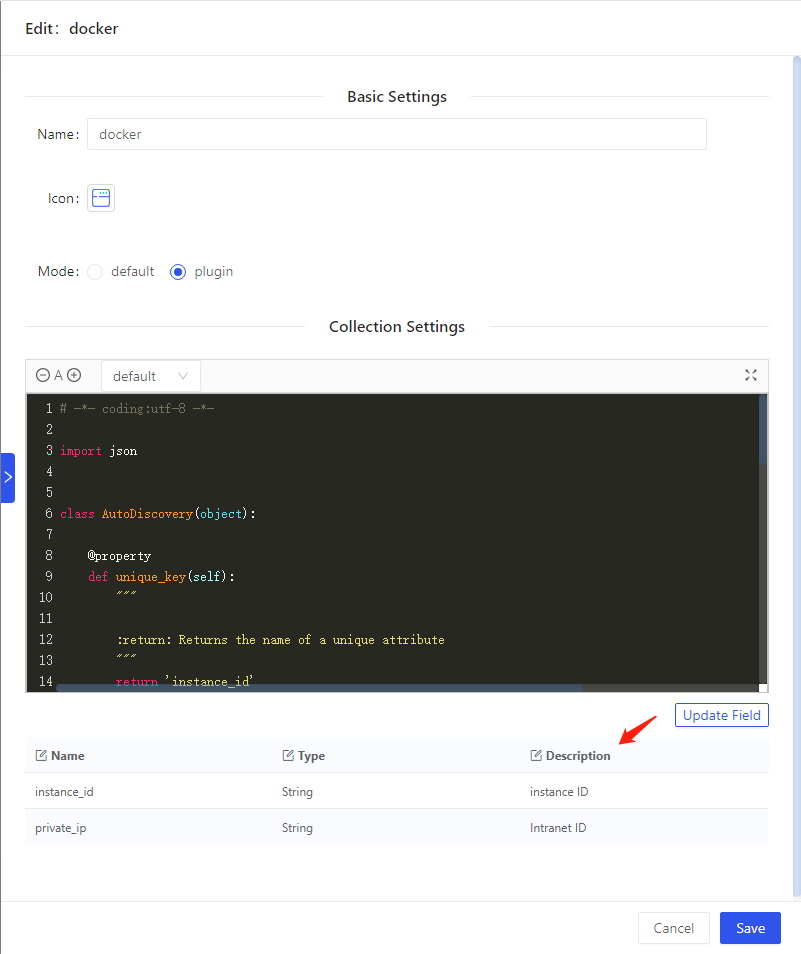
Click “Save” to successfully create a new custom plugin. As shown in the image above, we have created a new custom plugin named “docker”.
2. Model Association Customization Plugin
User opens the menu “Modeling”, selects a model (e.g. docker), opens the tab “Attributes AutoDiscovery”, and through the “Add” button to associate the custom plugin with the model.
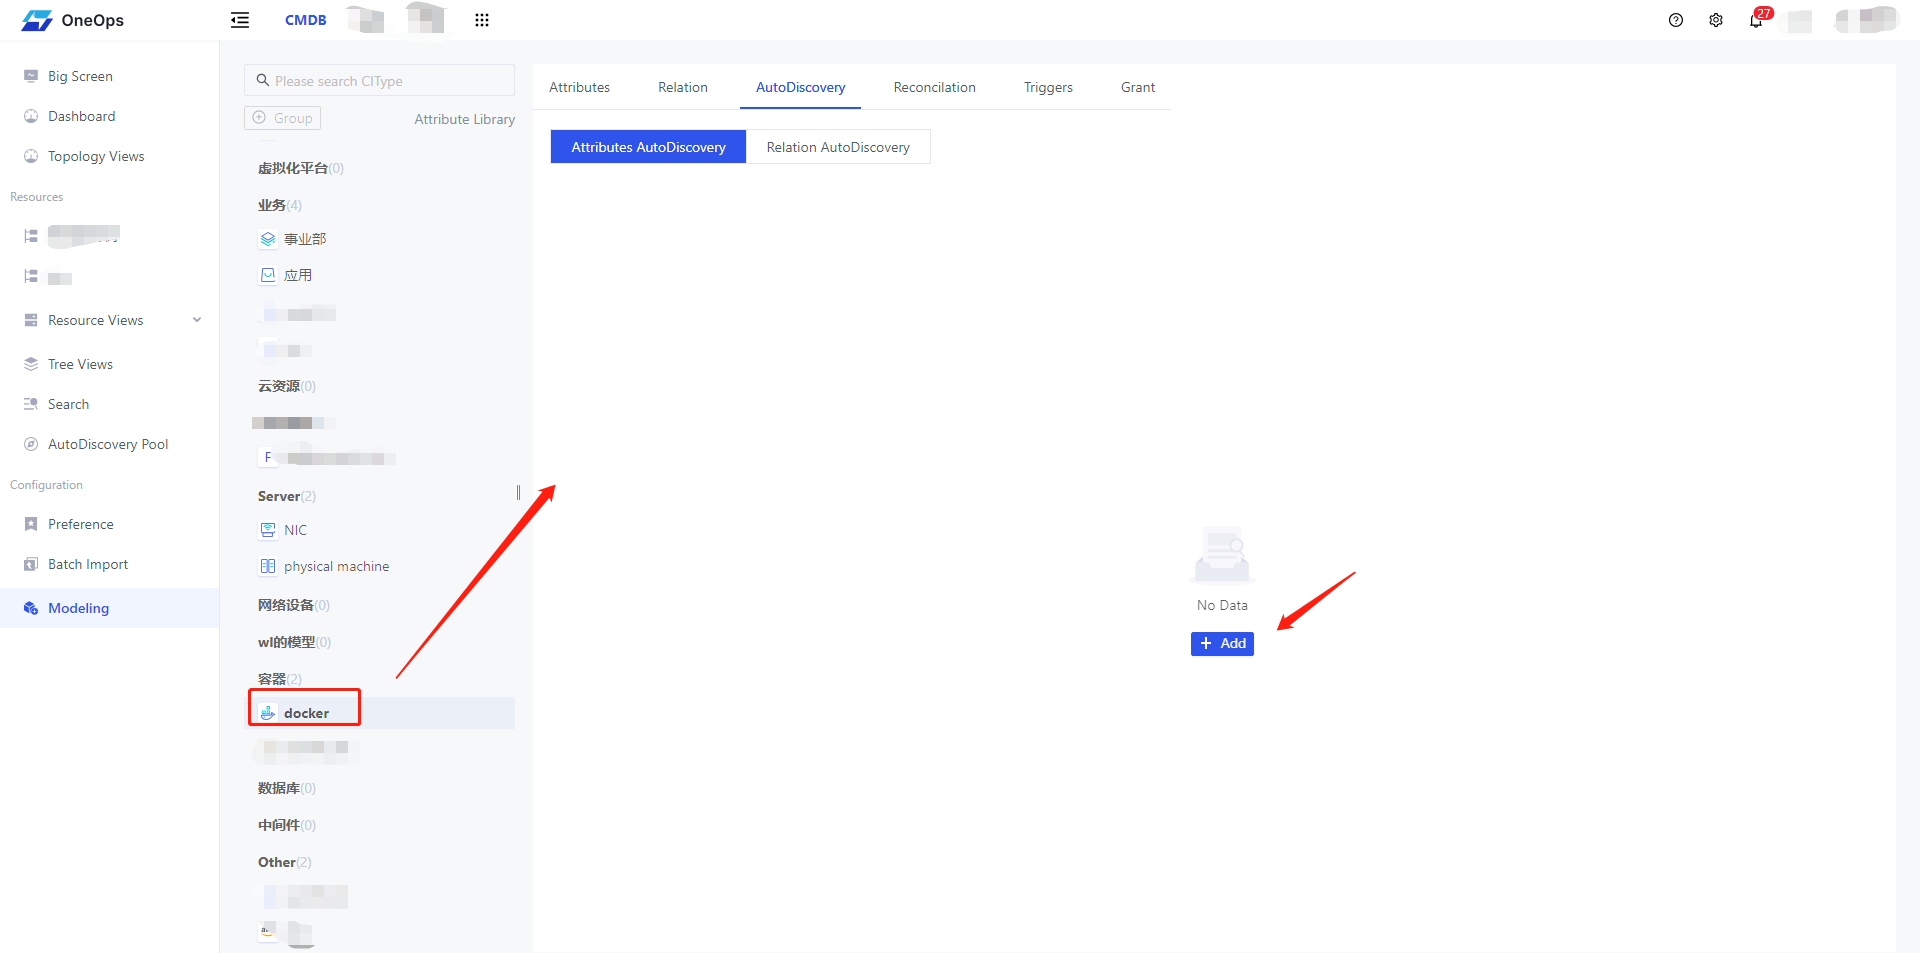
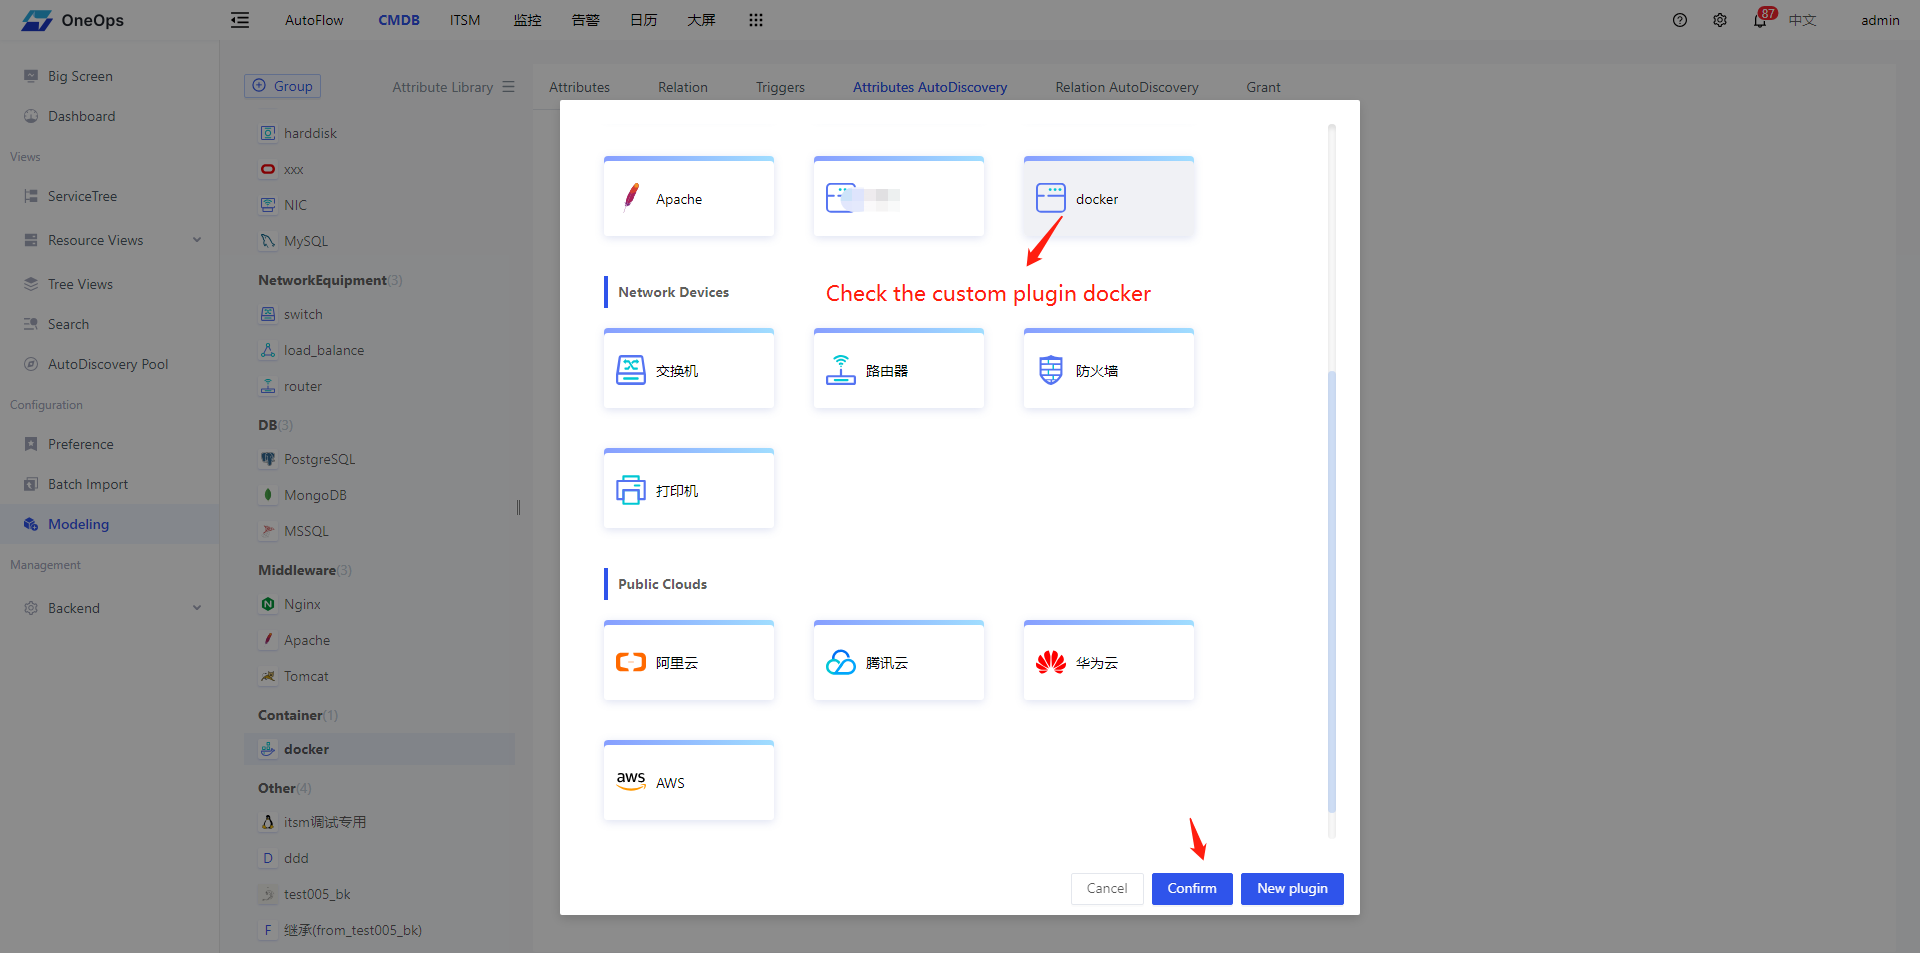
You may refer to Model Attribute Autodiscovery above to complete the execution configuration. Finally, click the “Save” button. This completes the association between the model docker and the custom plugin docker.
3. Configure relationship autodiscovery rules
After saving the attribute auto-discovery according to the previous step, switch to tab "Relationship auto-discovery" and configure the relationship auto-discovery rules, as shown in the following figure: for the auto-discovery attribute, we choose "private_ip", and for the association model attribute we The attribute "private_ip" is selected for the physical machine.

Click Save to complete the configuration of the relationship auto-discovery. When the value of the private_ip attribute of the autodiscovery resource matches the value of the private_ip attribute in the physical machine instance, the association is automatically completed.
4. View auto-discovered collection data
Click and enter the “Auto Discovery Pool” menu on the left side of the system, select the model (e.g., docker), and you can see the automatically collected data in the table on the right side, as shown in the following figure: