Install Guidance
For testing purposes, only install OneMaster to experience auto-discovery, IPAM auto-scanning, etc. If you need to use more machines for auto-discovery, you can install OneMaster and then install OneAgent.
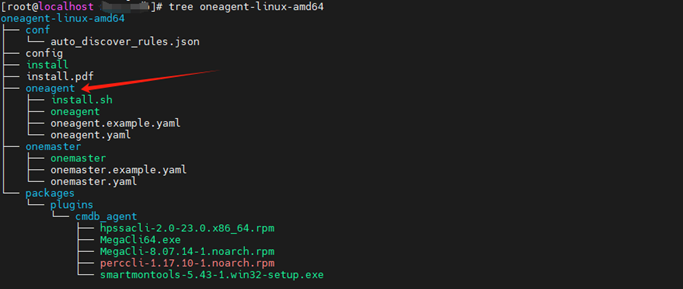
Project Structure
├── config
├── install
├── oneagent
│   ├── install.sh
│   └── oneagent.example.yaml
└── onemaster
    ├── onemaster
    └── onemaster.example.yaml
| Documentation | Description |
|---|---|
| config | Configuration |
| install | Install script, install scripts and install oneagent, onemaster; |
| oneagent | oneagent, typically installed on every machine required |
| onemmaster | oneagent's scheduler service, needs to be executed on a bundled server |
Installation OneMaster
Prerequisite:Place the zip package downloaded from the official application page on the bound server.
- Step 1 Extract the document, for example
oneagent-linux-amd64.tar.gzalong with other formats.
tar -xvzf oneagent-linux-amd64.tar.gz

- Step 2 Get the necessary configuration
This step is mainly to get
apiKeyandapiSecret. Log in toadminusers. You may refer to the screenshots below and click to fetch and, if empty, click Reset ` and fetch.
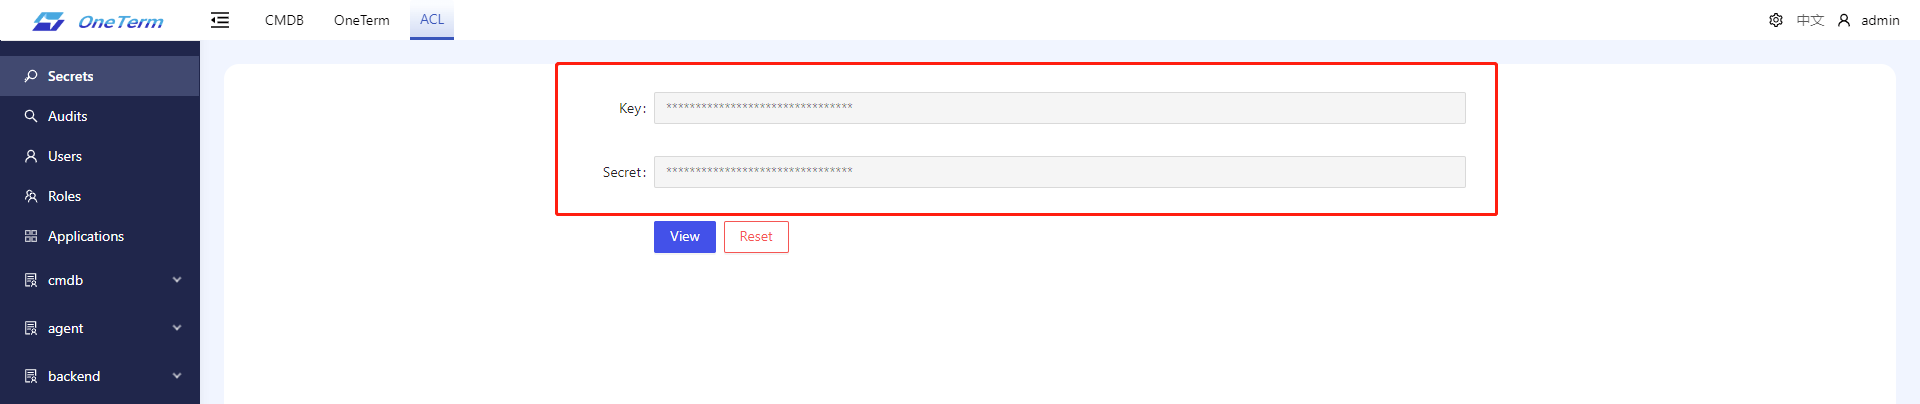
apiKey and apiSecret must belong to the admin, cmdb_agent, or worker users.
- Step 3 Modify profile
cd oneagent-linux-amd64
Opens the config file` to change the configuration in the configuration file.
#----OneAgent config---#
...

#--------OneMaster config------#
cmdbServer='localhost:8000' # CMDB Service Address, host+port;
apiKey='xxxx' # Step 2 Key
apiSecret='yyy' # Step 2, note that you must bind with a single quotation
licenceBindIp='' # of an ip, if generated unspecified (when machine becomes an IP), no input is required;
- Step 3 Installation, Be careful to switch to root user privileges, and keep the current path the same before and after switching. Generally, use sudo -i, the path may change after switching, so be careful to go back to the previous file path.
./install
- Step 4 Check the onemaster service.
The onmaster interval executes the following command twice for more than 10 seconds, confirming that
Activewill send a change without change as a success or installation.
systemctl status onemaster
# wait 10s
systemctl status onemaster

Install OneAgent
- Download oneagent probe: https://github.com/veops/cmdb-agent/releases
- Unzip the downloaded zip file to get an executable file. Place the file under sub-oneagent of the oneagent project of this deployment:
- Modify the
configfile
#--------------OneAgent config--------------#
OneAgentId='0x1234' # This configuration is user-defined, in the format of 0x + four digits, and all OneAgent Id's cannot be duplicated.
OneAgentName='Test01' # OneAgent alias, cannot be duplicated
OneAgentLogPath='/var/log/oneagent/oneagent.log' # log file path
OneMasterServer='localhost:7788' # The address of the OneMaster service, typically 7788 outlets.

#--------------OneMaster config--------------#
...
- Installation, Be careful to switch to root user privileges, and keep the current path the same before and after switching. Generally, use sudo -i, the path may change after switching, so be careful to go back to the previous file path.
./install
- Check oneagent services
systemctl status oneagent
- optionally, install
oneagenton any other desired machines Copy sub-oneagentproject under theoneagentproject of this deployment to the machine where the agent needs to be installed, and change the following parameters inoneagent/oneagent.yaml.
id: # OneAgent's ID, customizing, how to format; like OneAgentId in the `config` configuration file, you must modify the
name: # OneAgent alias in the `config` configuration file, and must change the
parent: # OneMaster server address, note that if localhost certainly needs to be modified
Install
./install
Configuring Discover Autodiscovery
- Download Discover Autodiscovery: https://github.com/veops/cmdb-agent/releases
- Place discover in
oneagent/packages/plugins/cmdb_agent
Services Controlv
Install
onemasterandoneagentall systemctl controls or more methods using the following commands.
 ./oneagent
./onemmaster