Models are the abstract of entities and concepts in the CMDB, The model enables the definition of different types of Configuration Items (CIs) and their attributes, relationships, and behaviors, helping organizations to clearly understand and manage the various components and resources in their IT infrastructure. In the following, we present an example of how to flexibly apply the feature optimization model of attributes with a new physical machine.
Overview of models
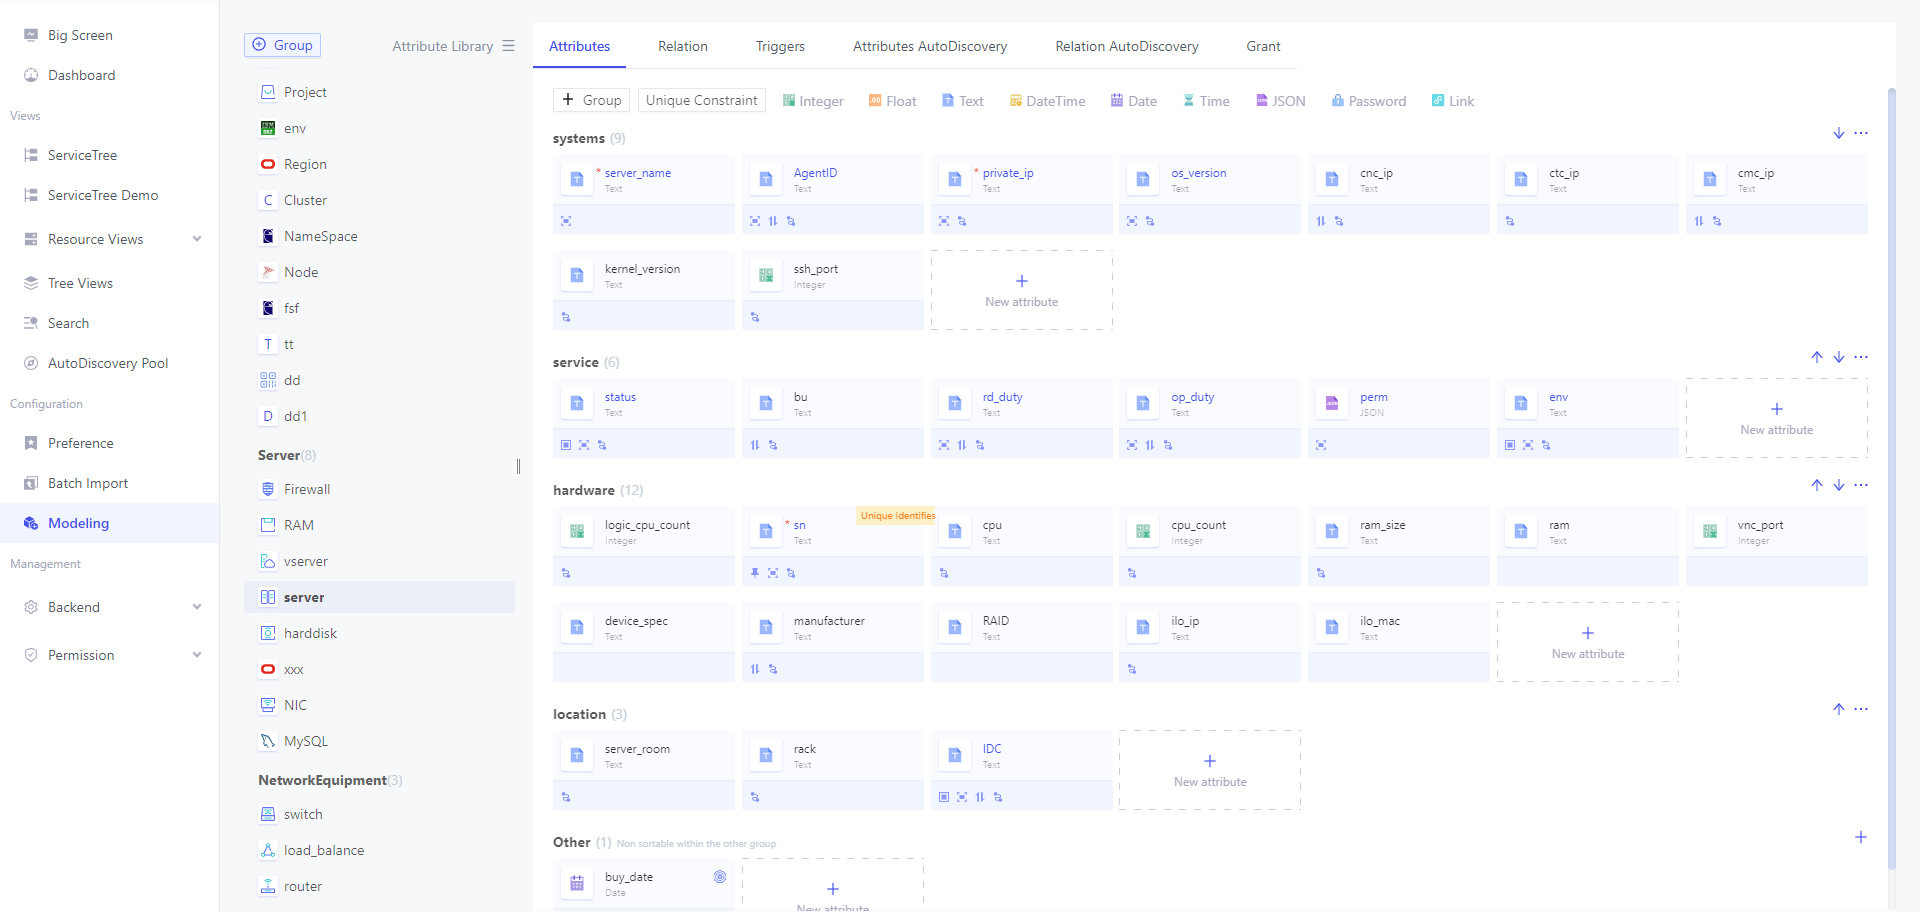
In the model Attributes, an attribute name inBlue indicates that the CI instance form displays the field by default; * identifier the field value is required; cards represent inherited properties.
Server is a built-in model for Veops CMDB,and all configurations can be freely configured by the user. In the Model Properties page, the user can configure the following:
- Model Group Name:is generally used for model classifications, such as business, servers, network devices, etc.
- Model configuration:includes model names, alias, icons, default sorting (This attribute is used as a sorting criterion when displaying resources), unique identifier (model must be configured).
- Model Drag sorting:Drag and drop sorting is available both within and between groups.
- Model Properties Group:for complex models, manage properties rationally.
- Model Properties:can configure property names, alias, data types, default values etc.
- Model Attribute Group Sorting:The button on the right of the group is used to sort the whole group.
- Model Properties Drag Order:User mouse over icons to drag and drop to sort within and across groups.
- Switching Model Views:Supports viewing models by model grouping or by model inheritance relationships. Switch between model views by clicking the view icon at the top of the model menu bar.
The system defaults to the group "Other", which does not support sorting.
New CI model
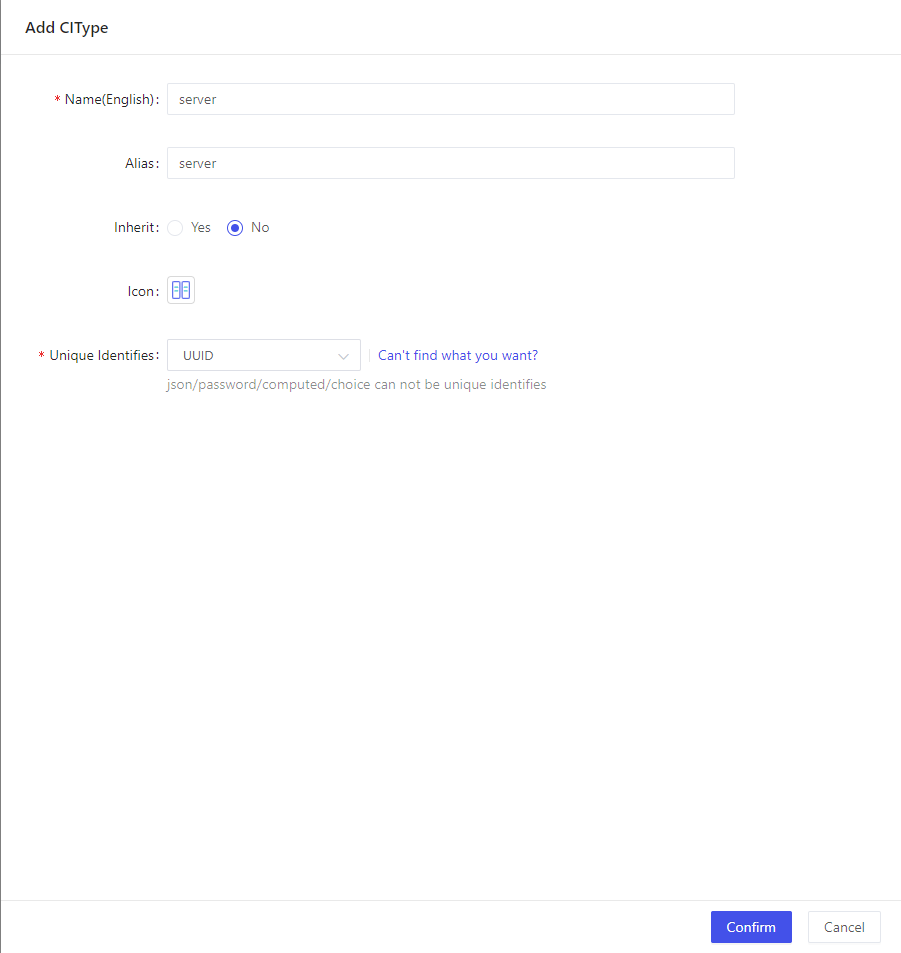
- Name(English):English name of the model, English name of the model is prohibited to be renamed.
- Alias:An alias is given to the model, which is also viewed and used by the user in the system.
- Inherit:Attributes and behaviors can be inherited from another model. Through model inheritance, a child model can inherit attributes from its parent model. Multiple models are supported to be checked.
Please be careful when performing operations to remove inherited models, as this may result in dirty data being generated for resource data, dashboards, etc.
- Icon:Configure an icon for the model. The system has a variety of built-in regular icons for users to choose from, as well as support for users to upload custom icons.
- Unique Identifier:A unique identifier for the model, such as a unique ID or primary key for each record. This unique identifier ensures that each configuration item has a unique identity in the CMDB, making it easy to find, update, and track it.
json, passwords, computed attributes, predefined value attributes cannot be used as unique identifiers.
Model Properties
When creating a model, Veops CMDB provides some configuration items to help users better fit their needs.
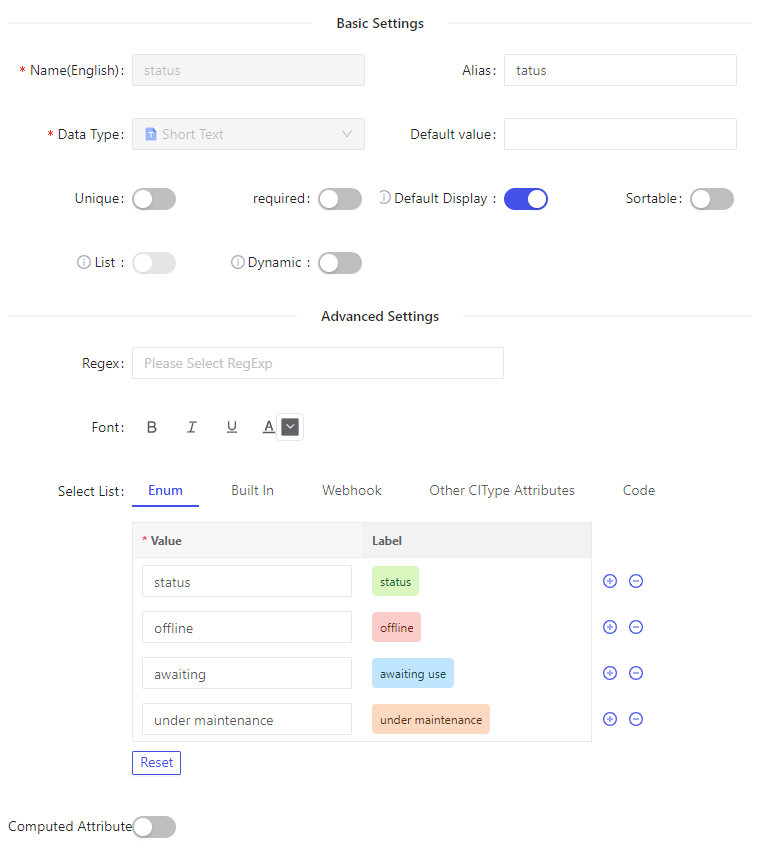
Basic Settings
- Datatype:includes integer, float, Short Text(Text Length ≤ 128), Long Text, date, date, date, time, JSON, password, link, Bool, Reference . Users can choose the appropriate type. Click Referential Attributeto see the use of the reference property. To learn more about password storage, go to Password Storage.
- Default value:to configure default initial value
- required:sets the attribute as required
- Unique:sets attribute values that cannot be repeated.
- Default Display:Check for CI instance tables to display this field by default
- Sortable:Check for CI instance tables to support sorting by attribute value
- List:field can be one or more values, the type of interface returns is list
- Dynamic:Dynamic attributes are mainly used in frequently updated data, the system will not record the changes of dynamic attributes, and when the user does data rollback in the change record, the dynamic attribute system will not do the processing
In cases where there are multiple operations managers, the configuration is set to accept multi-value.
Advanced Settings
Regular calibration
Setting regular checks for attributes ensures that the data entered meets specific formatting requirements and improves data accuracy. Instant format validation as the user enters the data can reduce errors and time costs for subsequent data processing.
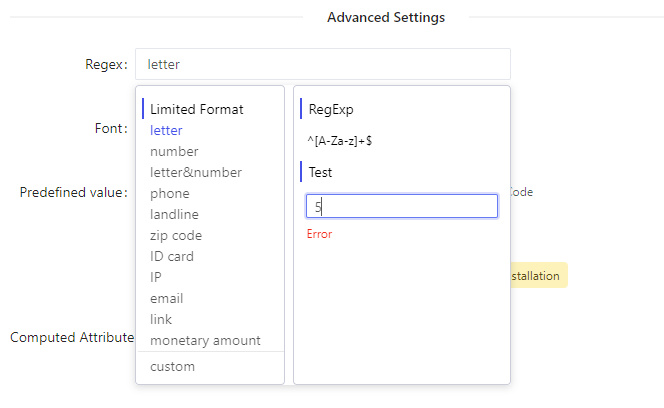
The system has built-in 11 kinds of (letter, number, letter&number, phone, landline, zip code, ID card, IP, email, link, monetary amount) limited format regular expressions for the user, in addition to supporting the input of customized regular expressions.
Select List
Specify data as selectable values for an attribute using Select List. The system supports five methods for setting drop-down list: Enum, Built In, Webhook, Other CIType Attributes, and Code.Among other model attributes and code, these two ways also support the configuration of cascade attributes, cascade attribute configuration, please refer to Cascade Attributes。.
- Enum:Click on the button to enter the required predefined value, while users can set icons, fonts, colors, etc. for each predefined value.
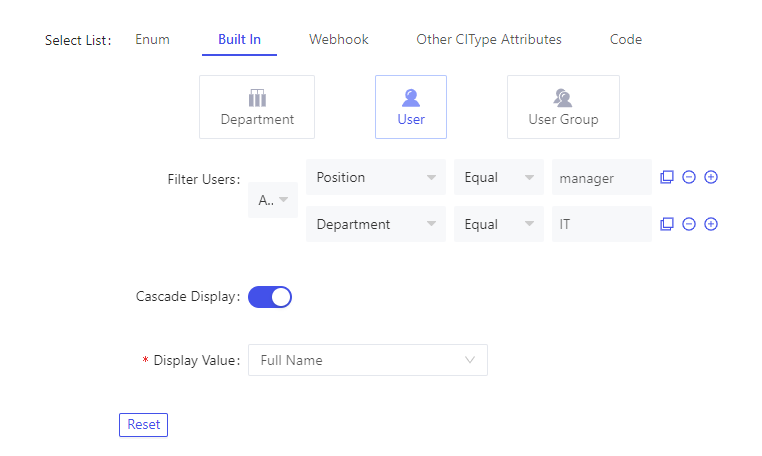
- Built In(Pro): By integrating the enterprise's user directory service, users and departmental information, which are organizational structure information, are dynamically introduced into the CMDB as a data source, ensuring that departmental and user information can be updated in real time to maintain data consistency and accuracy. Users can add user filtering filters on the configuration page, and can select the information items to be displayed (nickname, email, and cell phone number).
- Webhook:supports Get, POST, PUT, DELETE, along with Parameters, Body, Headers, Authorization, etc.Support filtering of results, returned results by field to filter, nested #separation, e.g. k1#k2,web request to return
{k1: [{k2: 1}, {k2: 2}]}, parse results to[1, 2]Support filtering of results, returned results by field to filter, nested #separation, e.g. k1#k2,web request to return{k1: [{k2: 1}, {k2: 2}]}, parse results to[1, 2] - Other Model Properties:by filtering, you can select the attribute values of other models that meet the conditions as optional values for this attribute.Improve data utilization and simplify data complexity.Improve data utilization and simplify data complexity.
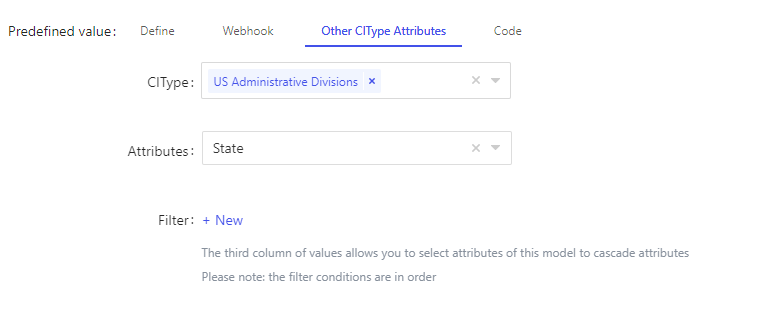
As shown in the figure above, we checked the model: US Administrative Division, and selected the model attribute: State, you can administrative division model of all instances of the state as the current attribute of the optional list of values, such as the need to filter the data to add filter conditions can be.
5. Script:This feature is open only to administrators, and the drop-down list of the property is achieved by writing the code to return the value.
In the Server model, the predefined value are used to add Definition items because the state is indigent, and users can choose between online, offline, awaiting use, under maintenance, installation.
Compute Attributes
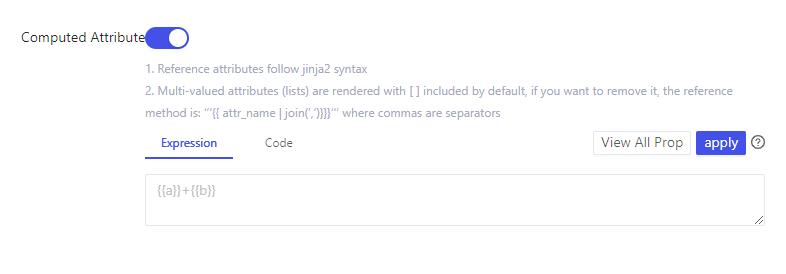
- Reference attributes follow jinja2 syntax
- Multi-valued attributes (lists) are rendered with [] included by default, if you want to remove it, the reference method is:
"""{{ attr_name | join(’,‘)}}}"""where commas are separators
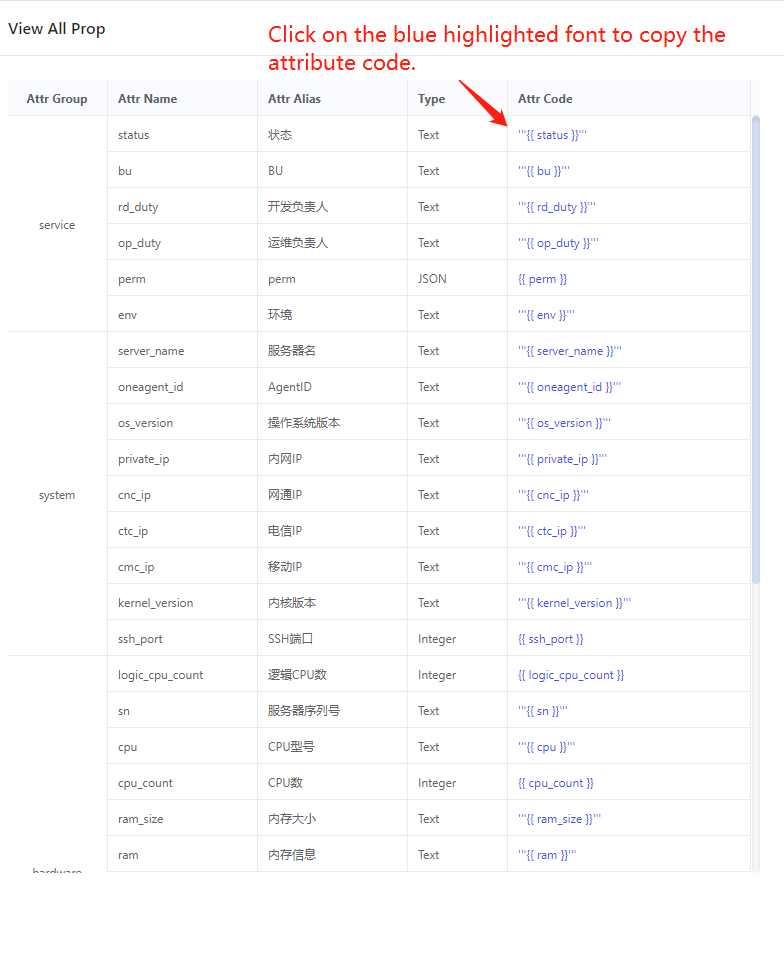
The value of a attribute is calculated through an expression built from other attributes of the model or by executing a piece of code. The reference method for the attribute is: {{ AttributeName }}:
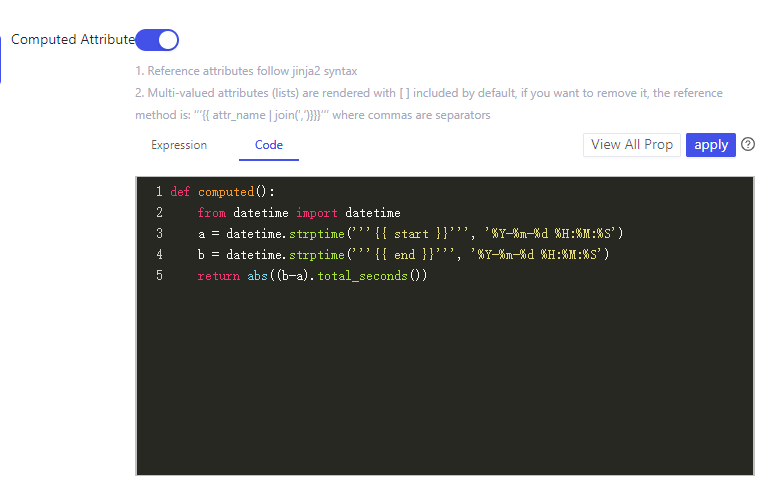
- Click the [View All Prop] button to view all the attributes of the current model by group, and click the “Attr Code” to finish copying and referencing the attributes:
- By clicking 'apply' btn, all CIs will trigger the calculation.
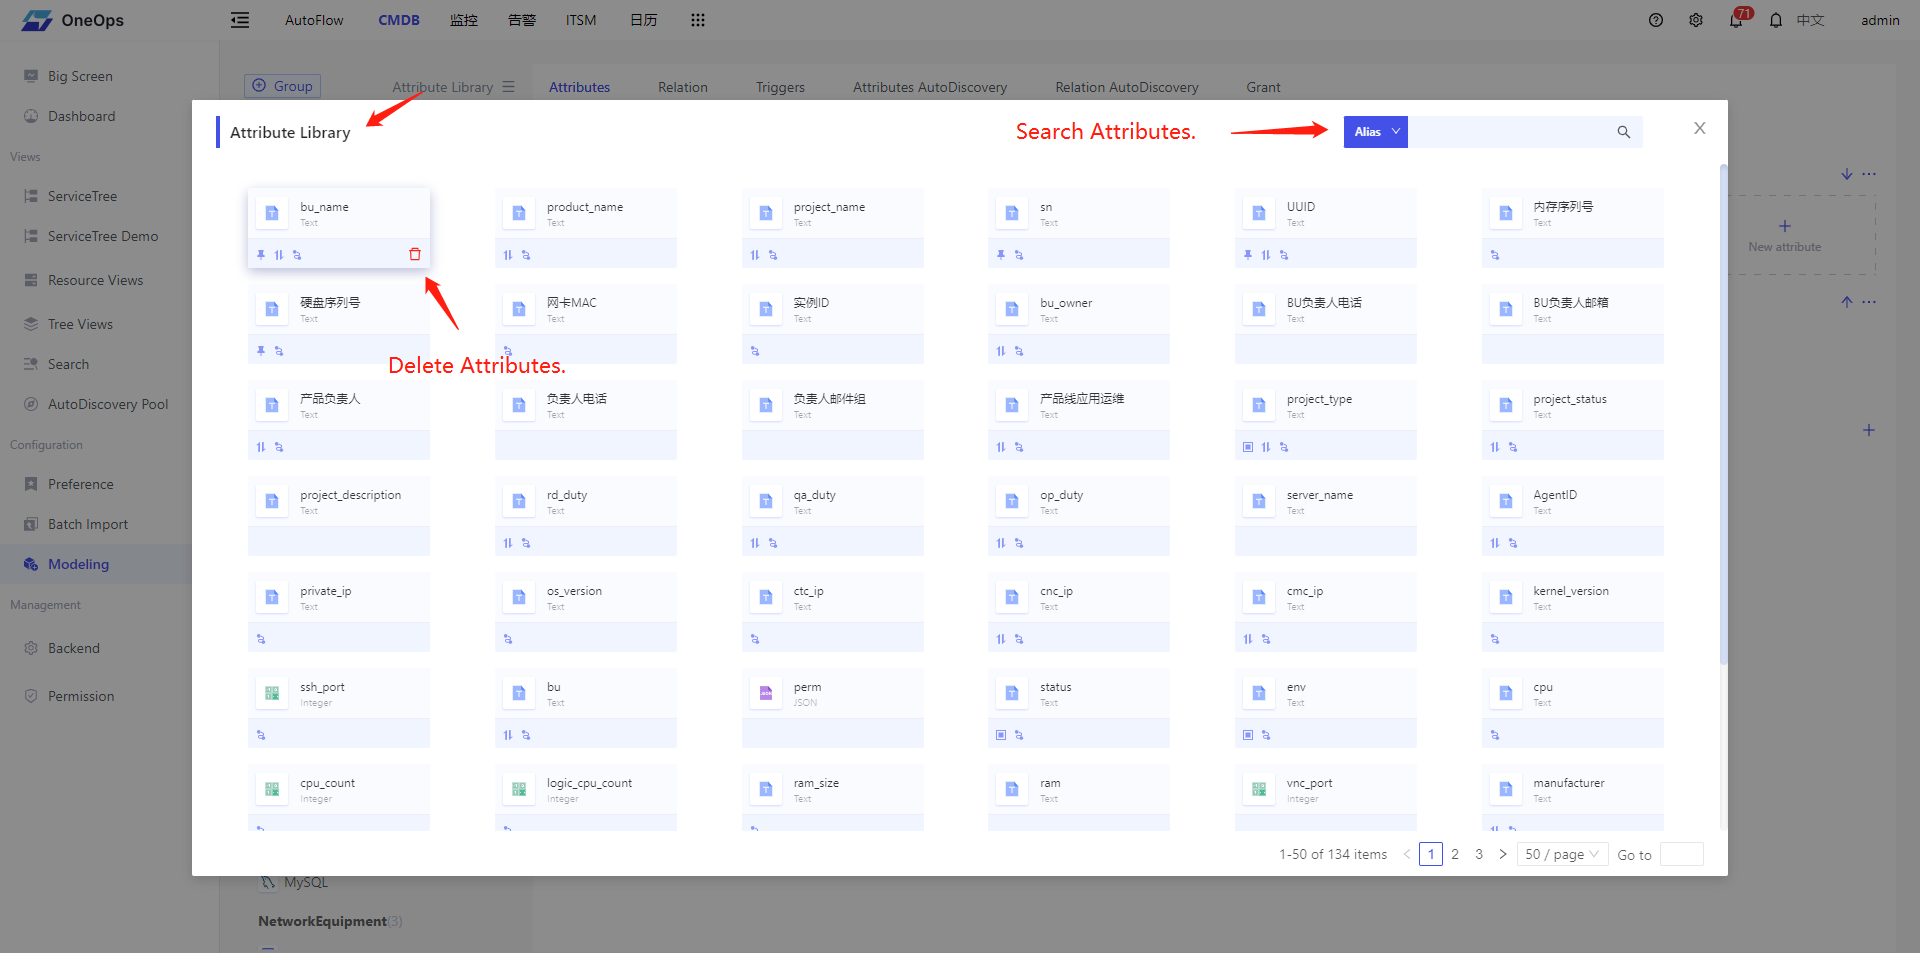
Attribute Library
The attribute library contains all the attributes that are already in the current system. Through the attribute library, users can find and delete attributes.

Auto-increment ID
Veops CMDB has a built-in configuration option for users called Auto-increment ID. The Auto-increment ID attribute allows you to simplify data management and manipulation, avoid data duplication or conflicts, and improve data identifiability and operability.
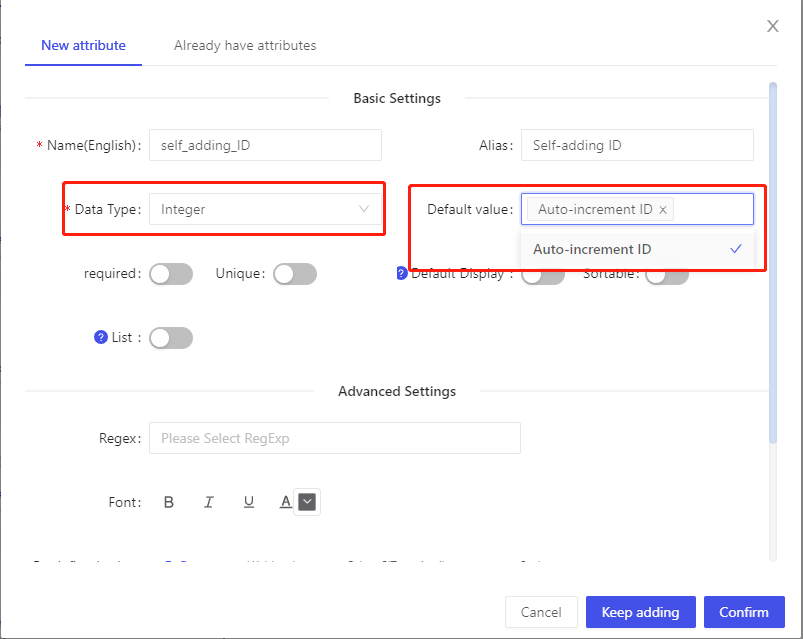
Configure the Auto-increment ID attribute as shown in the figure above, when creating a new attribute, select Integer for the data type and check Auto-increment ID for the default value. When you create a new CI, there is no need to fill in the value, the system will automatically generate the value of Auto-increment ID.
Automatic generation of creation time and update time
Veops CMDB for the user built-in configuration options for the creation time and update time, just need to data type DateTime attribute of the default value is set to Created At or Updated At can be, when the new or edit the CI, the system will automatically generate the creation time and update time of the CI. As shown in the figure below:

Referential Attribute
The Reference property is used to quickly view referenced model instances. When you create a new attribute, you need to select “Reference” for the data type and show the referenced model:
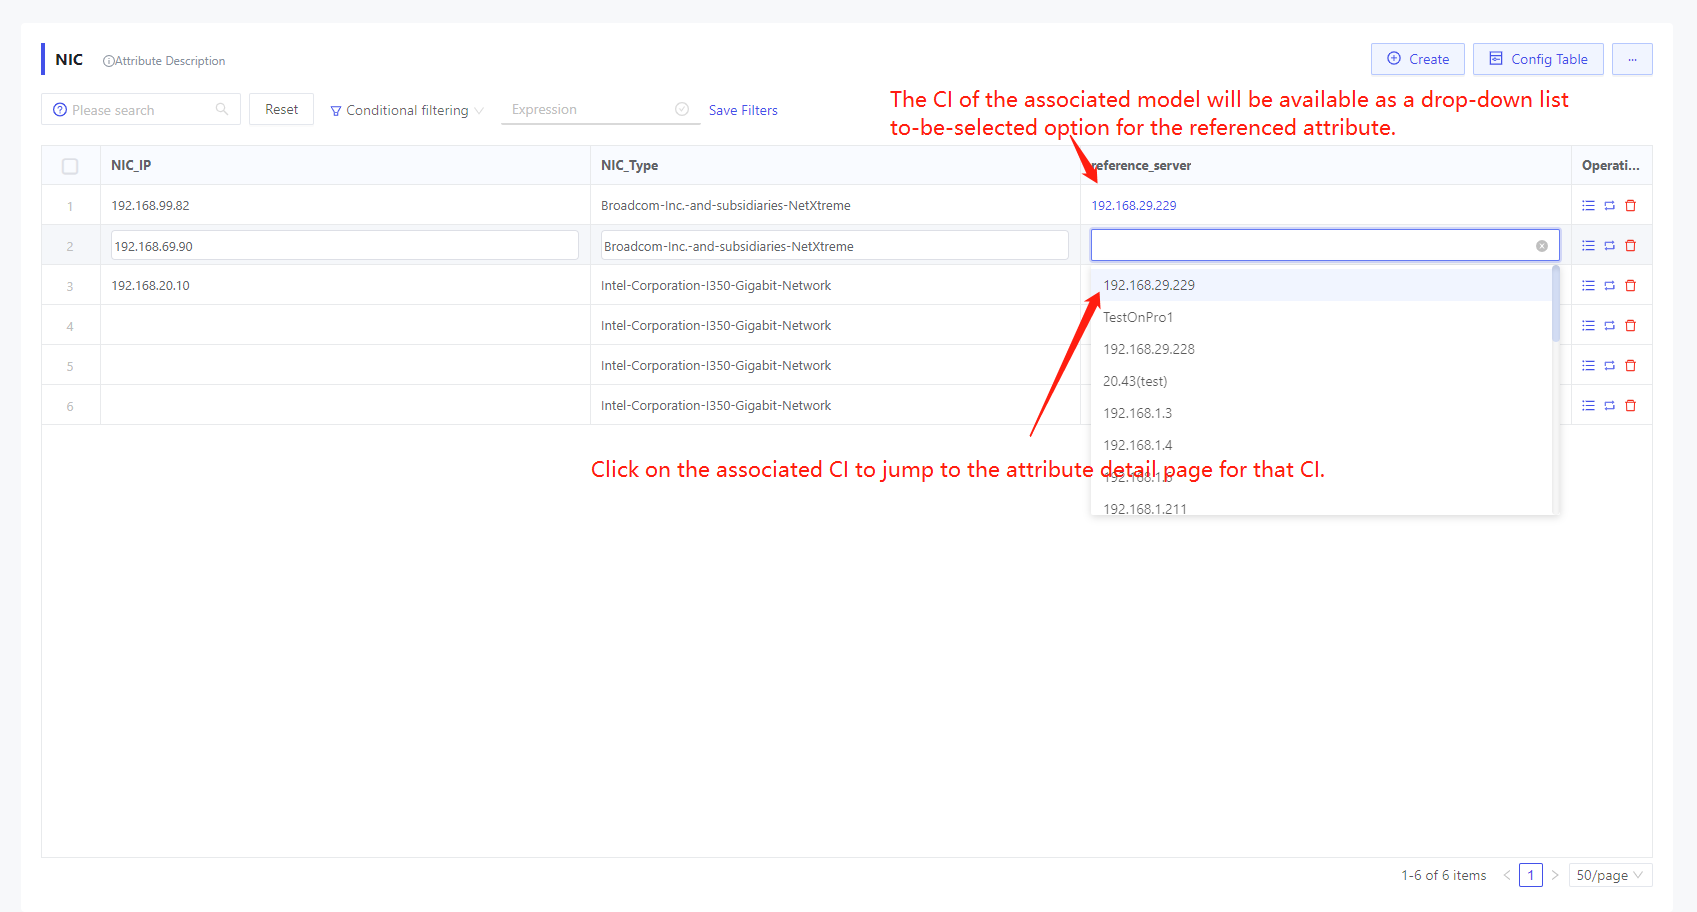
When a new or then edited CI instance is created, the CI that references the model will be available as a drop-down list of to-be-selected options for the referenced attribute. The referencing attribute supports linking to the corresponding CI detail page.
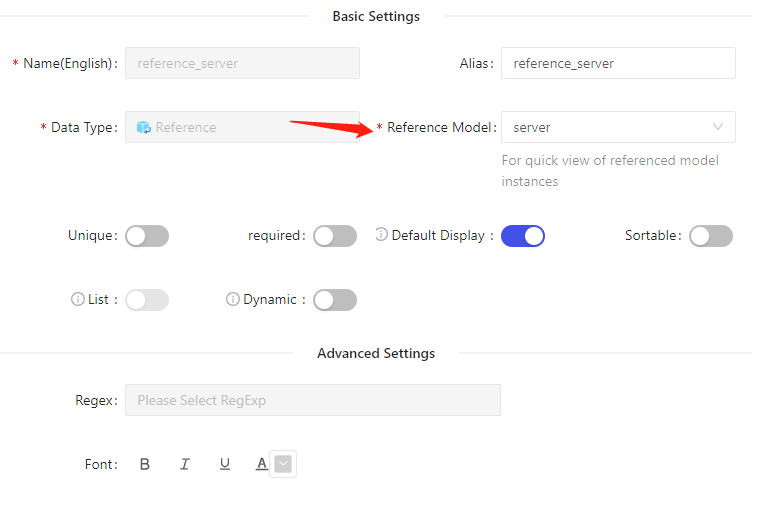
The value displayed in the Referenced Models drop-down list is by default the value of the model's unique identifier attribute, or you can view the Setting Display Properties for Models below to customize the display attributes of the referenced models.
Setting default sorting rules for models
By setting a default sorting rule, you can make it possible to present configuration item data in a specific order when viewing and retrieving it, improving the readability and operability of the data.
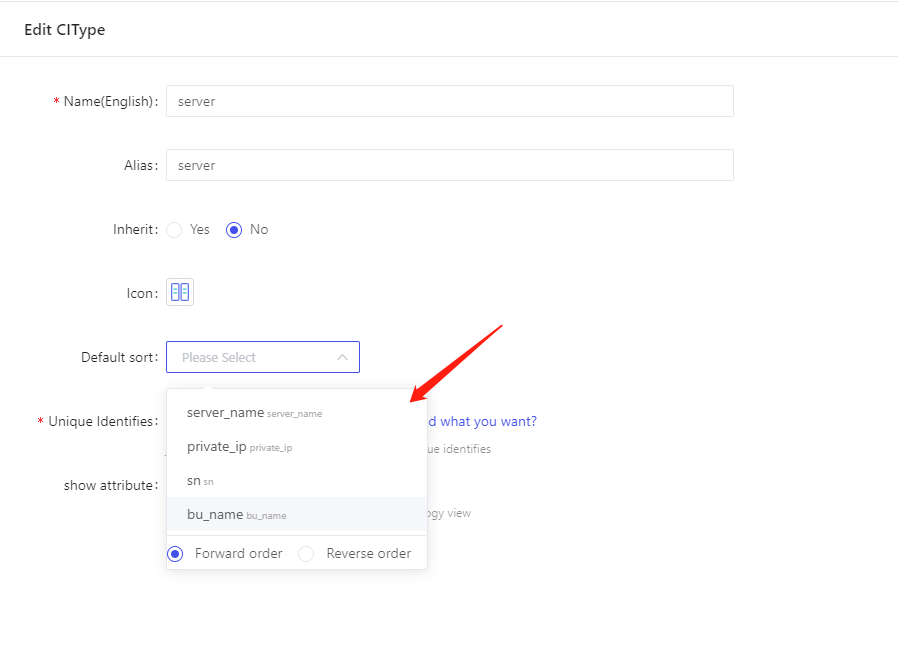
The default sorted drop-down list shows all required attributes for the current model.
As shown in the above figure, in the Edit Model pop-up window, select the attribute that needs to be sorted by default and the sorting method (forward or reverse), and then you can view the data of the configuration item sorted according to that attribute.
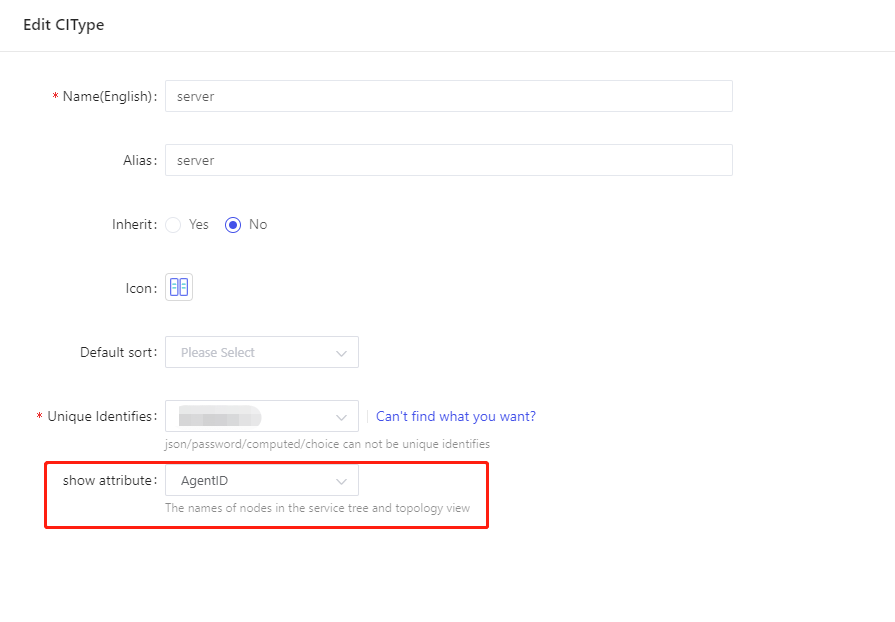
Setting Display Properties for Models
The show attribute will be used as the name of the node in the service tree and topology view. By setting display attributes for the model, users can highlight important attribute information, making it easy to quickly view and understand service tree nodes as well as nodes and connecting lines in the relationship topology diagram.
If the show attribute is not set, the model's unique identifier is used by default as the name of the node in the service tree and topology view.
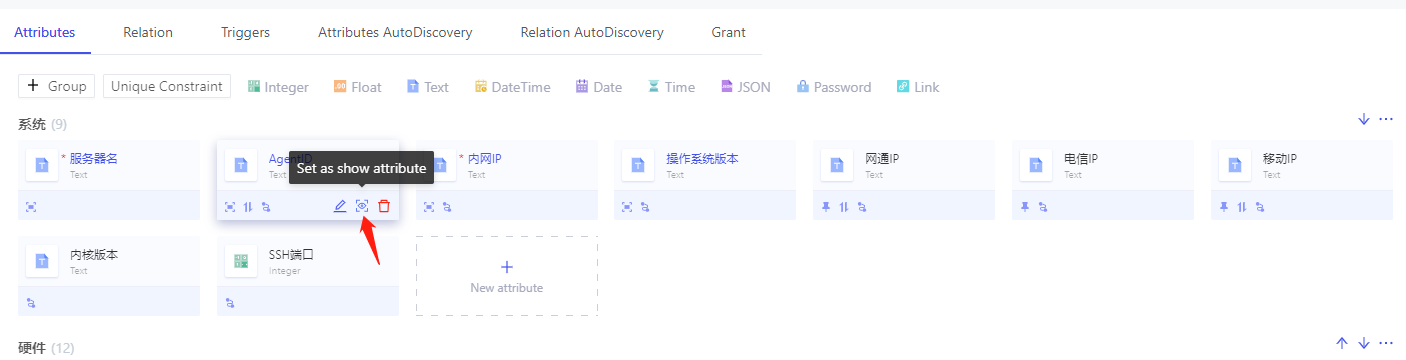
There are two ways to configure display properties:
- Edit the model and change the presentation properties
- On the Model Properties page, simply click the Show attribute button
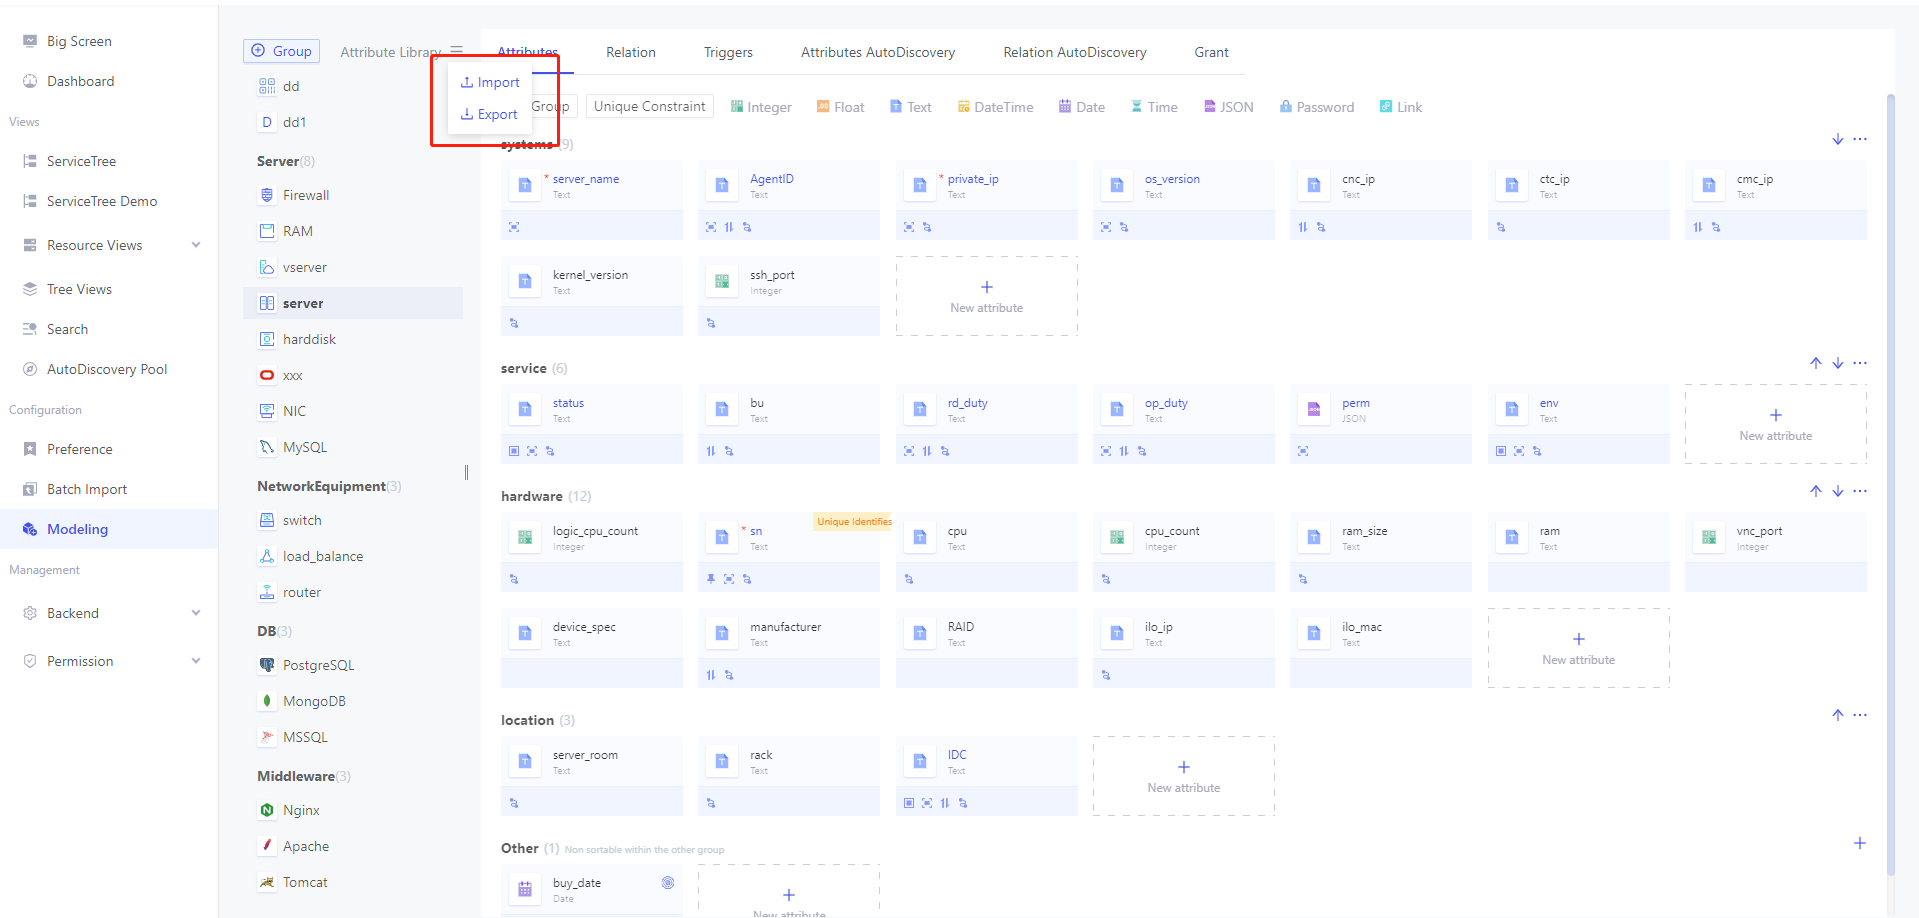
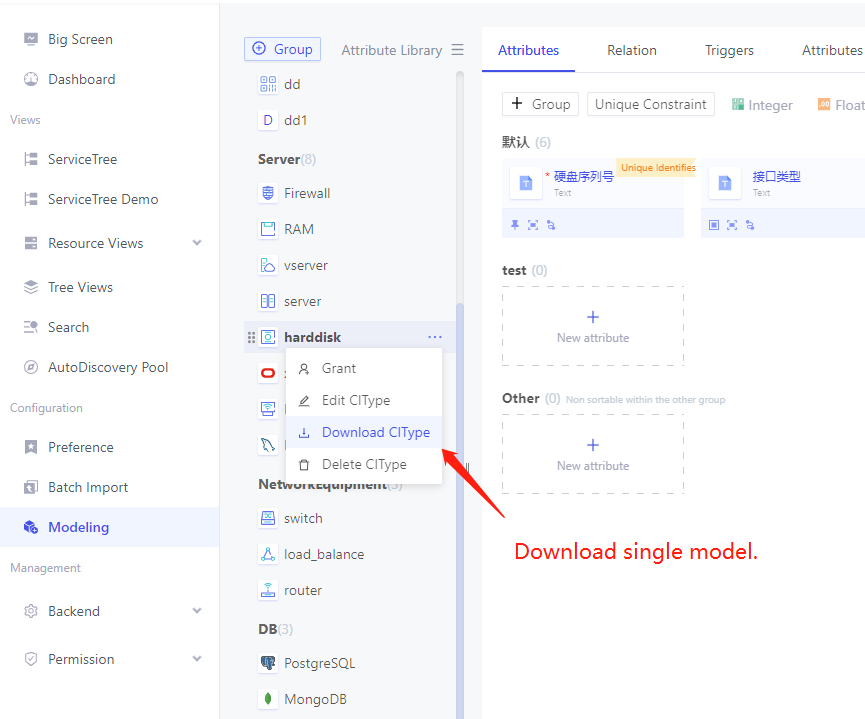
Import and export of models
With the import and export function, it is easy to migrate model data from one environment to another, realizing fast data migration and synchronization, saving time and labor cost. You can go to Veops' Template Market to download template files and import them into Veops CMDB with one click:
- For the attributes in the imported template, if the attribute does not exist in the system, it will add new attributes according to the configuration file, if the attribute already exists in the system, it will update the existing attributes, including attribute alias, data type and so on.
- Select List of attributes are only supported for importing Enum、Built In values. Drop-down list of Webhook, Other CIType Attributes and script types are not supported for importing at the moment.
- Model triggers do not support import.
Cascade Attributes
Cascade Attributes is part of the veops Enterprise Edition feature.
By defining cascading attributes, you can establish parent-child or dependency relationships between configuration items to better organize and manage related information between configuration items. Cascading attributes help users to understand the relationship between configuration items more clearly, which is helpful for managing, querying and analyzing configuration items.
veops CMDB supports cascading attributes by setting drop-down list for the attributes.
Accessed via "Modeling"-"Attributes"-"Edit attribute"-"Advanced Settings".
Configuring Cascade Properties via Other CIType Attributes
The next example is a generic U.S. administrative division to demonstrate how to configure the cascade attribute in CMDB.
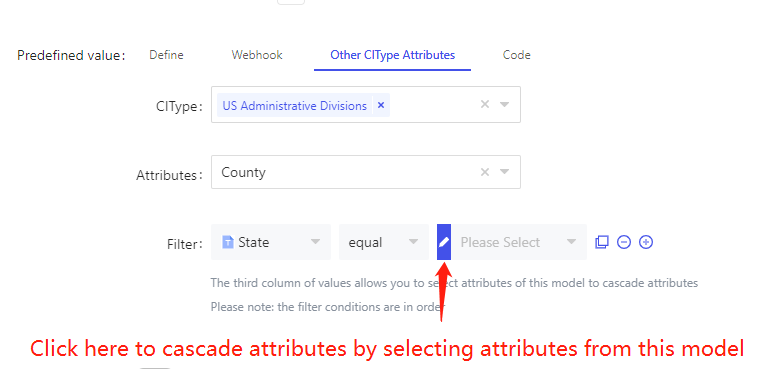
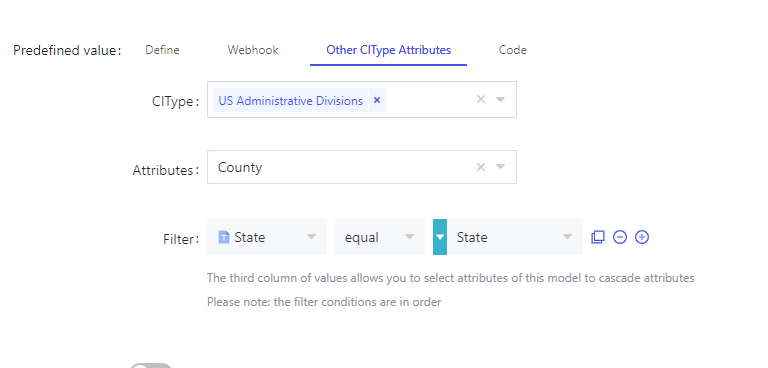
US Administrative Divisions model contains data on U.S. states, counties, and cities. As configured above, the value of the current attribute will depend on the value of the state, filtering out instances in US Administrative Divisions model where the state has the same value as the current instance attribute state, and using the counties of these instances as optional values for this attribute.
In the subsequent new or edited instances, we can only select the value of the county when the state is filled in, as shown in the following figure, after checking California, click on the county to select data from all the cities under California.

As needed, you can continue to configure the secondary and tertiary cascade attributes, when configuring the cascade attributes, please pay attention to the order of the filter conditions:
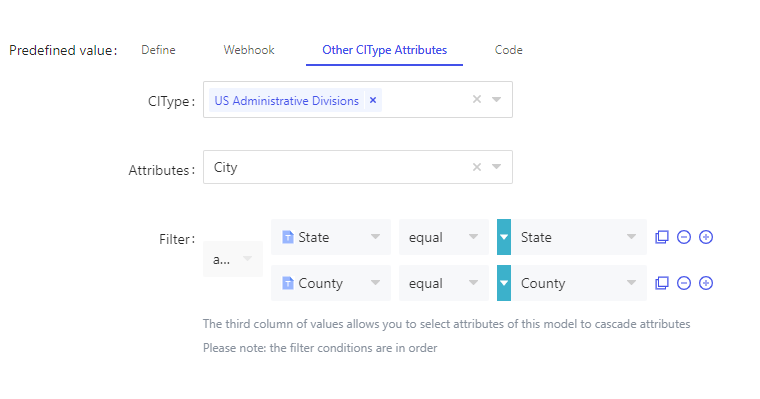
The third column of values allows you to select attributes of this model to cascade attributes.
Please note: the filter conditions are in order.
Configuring Cascade Properties through Code
- Reference attributes follow jinja2 syntax.
- Multi-valued attributes (lists) are rendered with [] included by default, if you want to remove it, the reference method is:
"""{{ attr_name | join(',') }}"""where commas are separators. - Click the [View All Prop] button to view all the attributes of the current model by group, and click the “Attr Code” to finish copying and referencing the attributes:
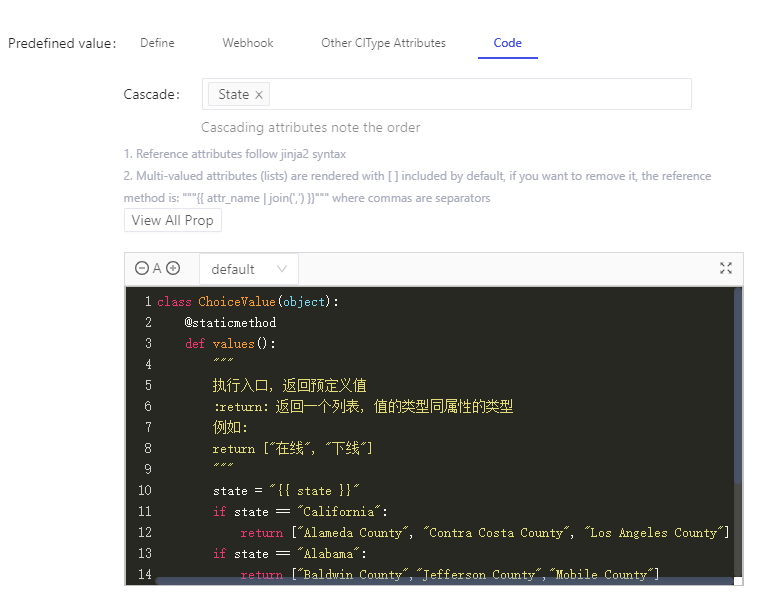
If you don't need the cascade attribute, just leave the cascade field empty, if you need to configure the cascade attribute, please check the box in the order of the cascade.
Next article we describe how to create new data in the model.